ChannelAdvisor to Magento Connector V1
User Guide
Table of Contents
- B. HOW TO USE THE CHANNELADVISOR TO MAGENTO CONNECTOR3
- P-1. ChannelAdvisor API Settings 3
- P-2. Export Orders to ChannelAdvisor 3
- P-3. Import Orders from ChannelAdvisor 3
- P-4. Update Shipment to ChannelAdvisor 3
- P-5. Update Products to ChannelAdvisor 3
- P-6. Setting for Configurable/Grouped Products 3
- P-7. Update Products from ChannelAdvisor 3
- P-8. Ignore Products 3
- P-9. Error Handling 3
- P-1. Request ChannelAdvisor API Access 3
- P-2. Attribute Map 3
- P-3. Attribute Set Mapping Settings 3
- P-4. Attribute Set/Classification Map 3
- P-5. Queued Items 3
- P-6. Distribution Centers Map 3
- P-7. Category Import Methods Settings 3
- P-8. Image Placement Settings 3
- P-9. Shipping Methods and Payment Methods Mapping Settings 3
- P-10. Manage Sales Sources for Product Update Settings 3
- P-11. Synchronization Error Messages/Synced Orders 3
- P-12. Mass Update to ChannelAdvisor Settings 3
- P-13. Update SKUs to ChannelAdvisor/Import SKUs or Product Images from ChannelAdvisor 3
- P-14. View Logs 3
- P-15. Import/Export Module Configuration 3
a. FEATURES
The module provides real-time connectivity from Magento to ChannelAdvisor and fast updates from ChannelAdvisor to Magento via the ChannealAdvisor API and includes failover detection to ensure the integrity of your data. Its features are as follow.
 Real Time Inventory Updates
This has the real time update from Magento into ChannelAdvisor on creation, editing and deletion of products, including mapping of image information.Contacts ChannelAdvisor at a user designated interval (default 15 minutes) and checks ChannelAdvisor for modified product data. If changes are found these are then imported into Magento.Inventory is mapped from Magento to ChannelAdvisor via an easy to use attribute mapping system inside the Magento admin panel and module configuration.
Real time stock synchronization
When stock is decreased in your Magento store ChannelAdvisor is contacted and stock is automatically decreased, this can of course be switched off if it is not required.Contacts ChannelAdvisor at user designated interval (default 15 minutes) to check for changes in stock level and updates Magento stock accordingly, last known stock levels on both systems are kept in the Module database to enable comparison on update so that if a decrease has occurred on both systems then the correct tally is found and applied to both systems.
Order Management and Fulfillment
Orders flow from Magento from ChannelAdvisor and vice versa at a user designated interval (default 10 minutes). 10 minutes is advised by Ebay to be the required notification period of new orders from their marketplace.Orders are prefixed by a combination of ChannelAdvisor and Marketplace for example AM for amazon – these prefixes can be user defined, the module then identifies the orders based on these prefixes and sends fulfillment details (shipping carrier, type and shipping details) back to the marketplace via ChannelAdvisor when the order is marked as complete or another user designated order status.You can map the shipping and billing methods to match your business needs so order importing and fulfillment updates are very flexible.Magento orders are imported into ChannelAdvisor into their own Magento Marketplace.
Multiple Store Support
Connect each store view on Magento to one ChannelAdvisor account so you can keep all your ChannelAdvisor accounts in synchronization.The store view attribute data will be used to send to the ChannelAdvisor account you connect to.
Variation Items Support
Both Configurable products and Grouped products will update as variation items with their child products associated.Create configurable and grouped products from variation items when products are imported to Magento and vice versa when importing from Magento to ChannelAdvisor by using our simple mapping process.
B. HOW TO USE THE CHANNELADVISOR TO MAGENTO CONNECTOR
This guidance shows you how to run this module smoothly and appropriately with simple information. It provides explanations, details and images for reference.
WiseRobot ChannelAdvisor Configuration
On the Magento Admin Panel, navigate System → Configuration → WiseRobot ChannelAdvisor Settings
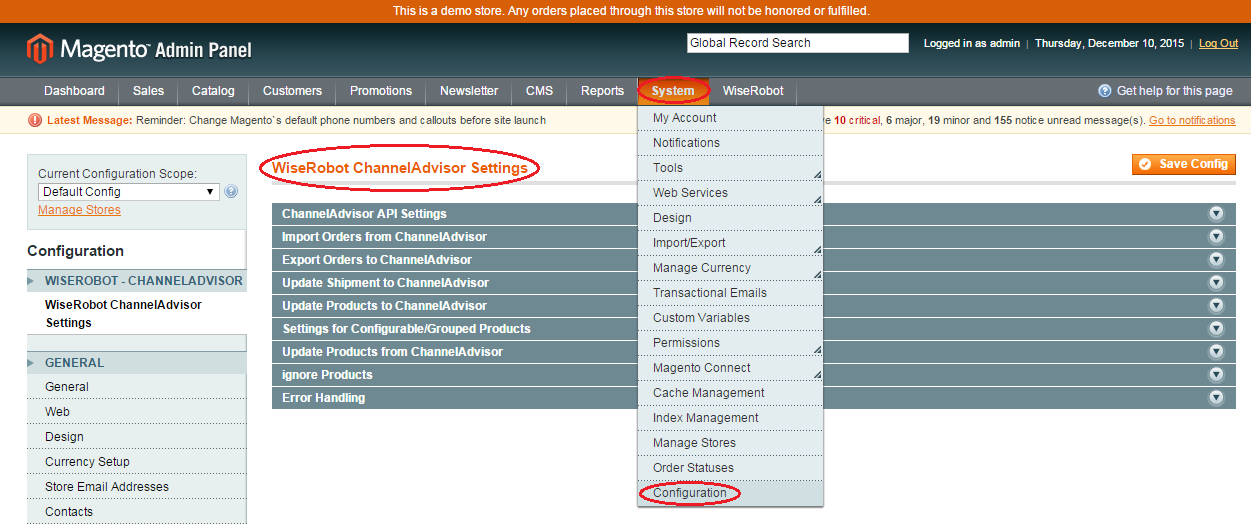
On the WiseRobot ChannelAdvisor Settings page, there are 9 module settings such as ChannelAdvisor API Settings, Import Orders from ChannelAdvisor, Export Orders to ChannelAdvisor, Update Shipment to ChannelAdvisor, Update Products to ChannelAdvisor, Setting for Configurable/Grouped Products, Update Products from ChannelAdvisor, Ignore Products and Error Handling respectively.
P-1. ChannelAdvisor API settings
Configuring the ChannelAdvisor API Settings is the first and foremost critical step in connecting your Magento store to ChannelAdvisor. The API settings process has two-important processes involved.
1. Step 1 - Request and authorize a Developer Key
This stage allows you to develop an integration code with the ChannelAdvisor API and to access one or more ChannelAdvisor Client Accounts.
a. To request a Developer Key
Using your browser, navigate to ChannelAdvisor API Developer Credentials. Click here.
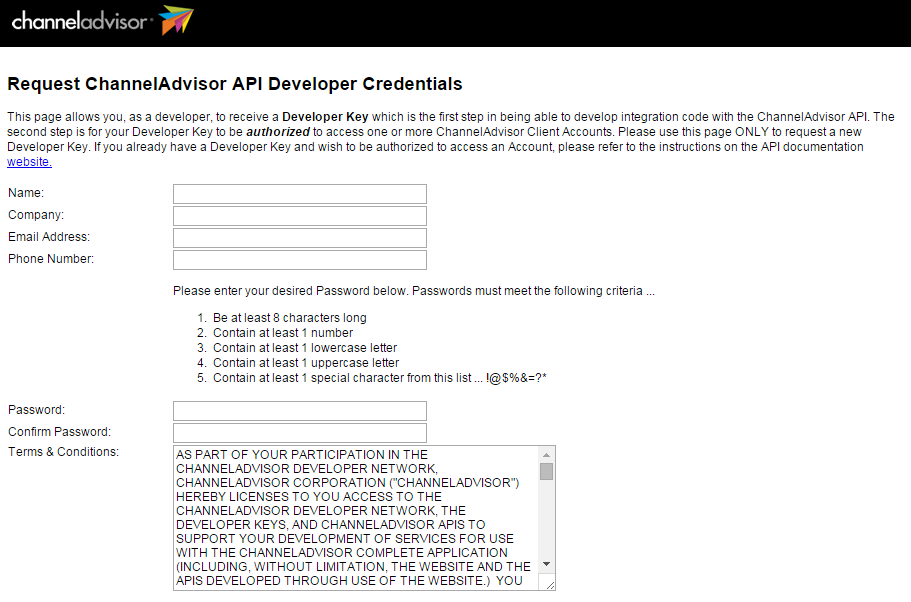
- Enter Name, Company, Email Address, Phone Number, Password and Confirm Password.
- Read Terms and Conditions → if you agree, click on Submit Request button.
- Two notification emails from ChannelAdvisor Developer network will be sent to your registered email after finishing this step.
- The first coming email requires you to activate your ChannelAdvisor API Developer Credentials. After activating it, you will receive the second email containing your developer key.
b. To have your Developer Key authorized
Using your browser, navigate to the ChannelAdvisor Client Login. Click here.
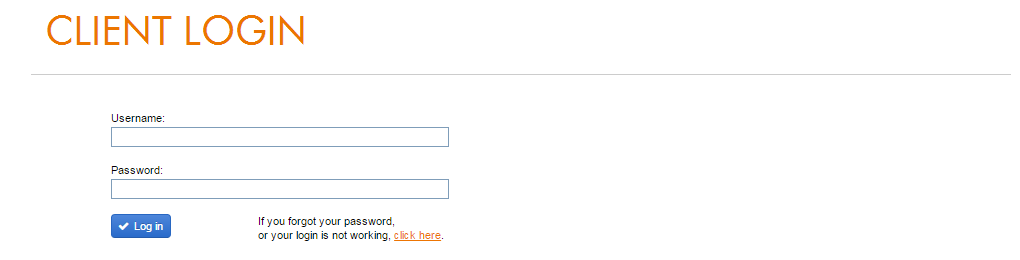
- Enter your User name and Password
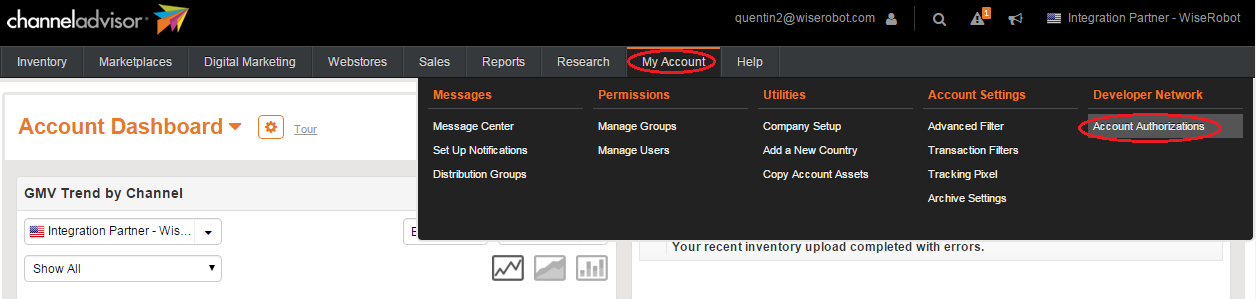
- On the Admin Menu, select My Account → Developer Network → Account Authorizations
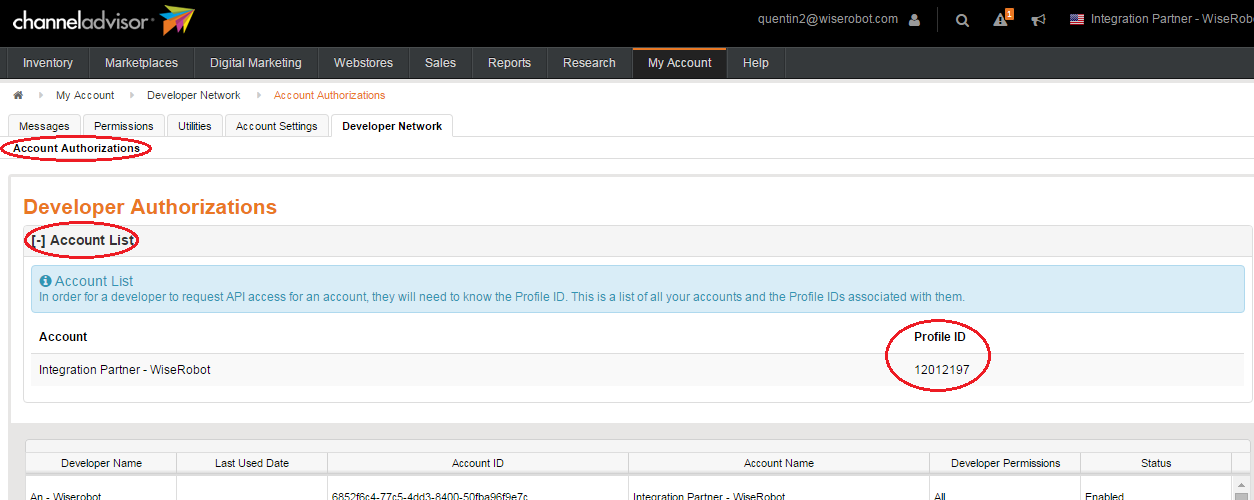
- From the Account Authorizations page, click on [+] of Account List → get Profile ID
After getting profile ID, send us your developer key and its password to [email protected] which you used to request developer key and Profile ID. We will then generate a request to access your ChannelAdvisor API (navigate WiseRobot → ChannelAdvisor API → click on Request API Access → type Profile ID).
2. Step 2 - Connecting from Magento to ChannelAdvisor using ChannelAdvisor Account ID
a. Access the WiseRobot ChannelAdvisor Settings
- Using your own browser to login to your Magento
- On the Magento Admin Panel, select System → Configuration
- On the WiseRobot ChannelAdvisor Settings page → ChannelAdvisor API Settings
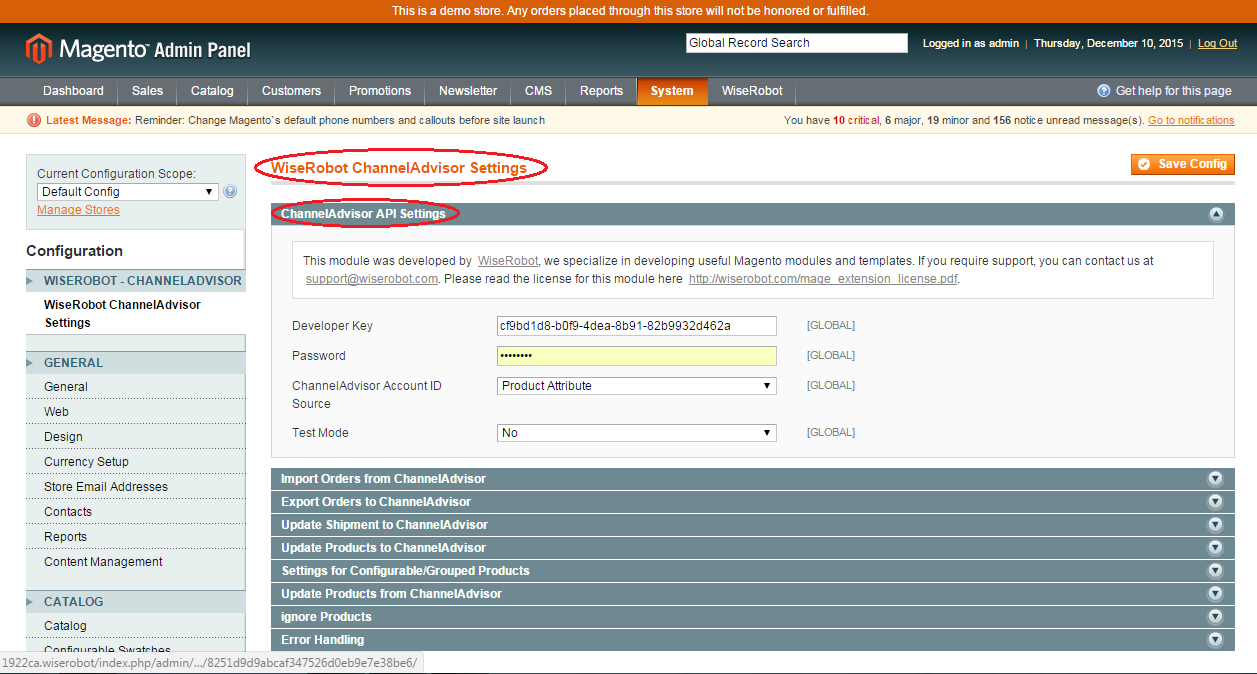
b. Connecting Magento to ChannelAdvisor employing ChannelAdvisor Account ID
- From the ChannelAdvisor API Settings page, enter your Developer Key and Password.
-
In the Test Mode tab:
- Set “Yes” if updating some selected products with SKUs which are listed in Test SKUs table (this table only appears when you choose “Yes” on the Test Mode tab).
- Set “No” if updating all products.
-
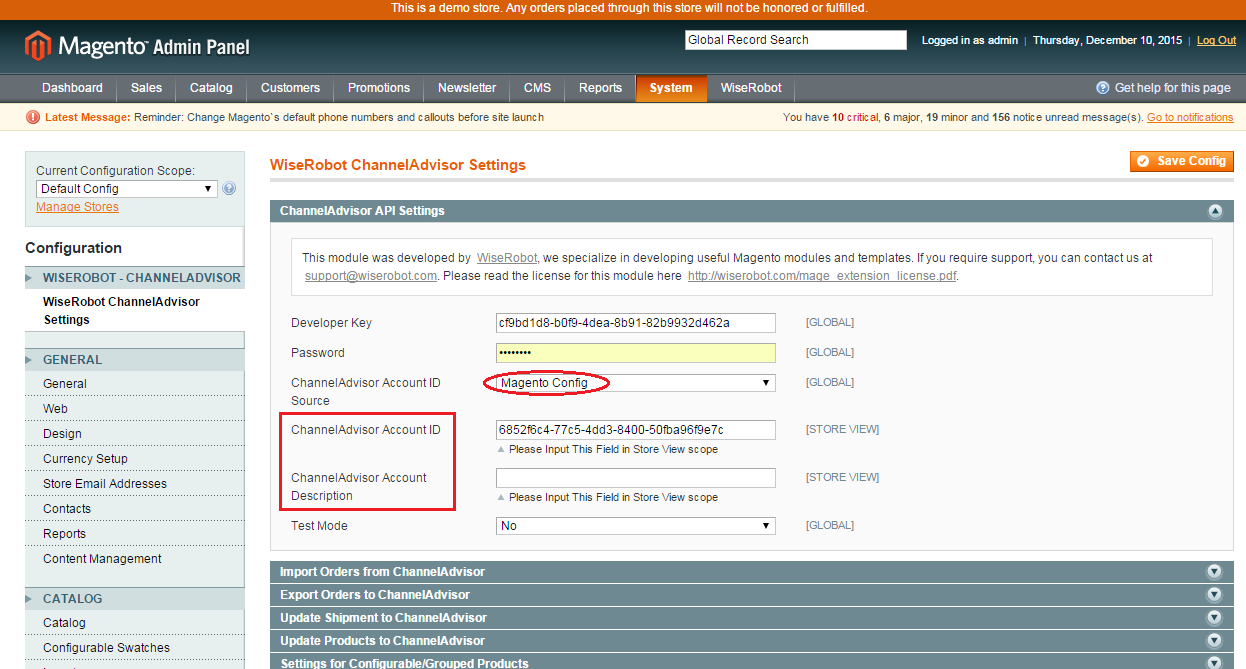
In the ChannelAdvisor Account ID Source tab:
- Set Magento Config → fill ChannelAdvisor Account ID which is taken from the Account ID column in the Account List (via Account Authorizations page of your ChannelAdvisor). ChannelAdvisor Account Description (optional) just provides you to take note for management. Then, click on Save Config tab (on the top-right corner page) when you finish. Completion of this step means that all your mappings will be implemented through this account.
- Set Product Attribute → the next step is getting account ID for Color attributes.
- Click on Save Config button at the top-right corner when you finish.
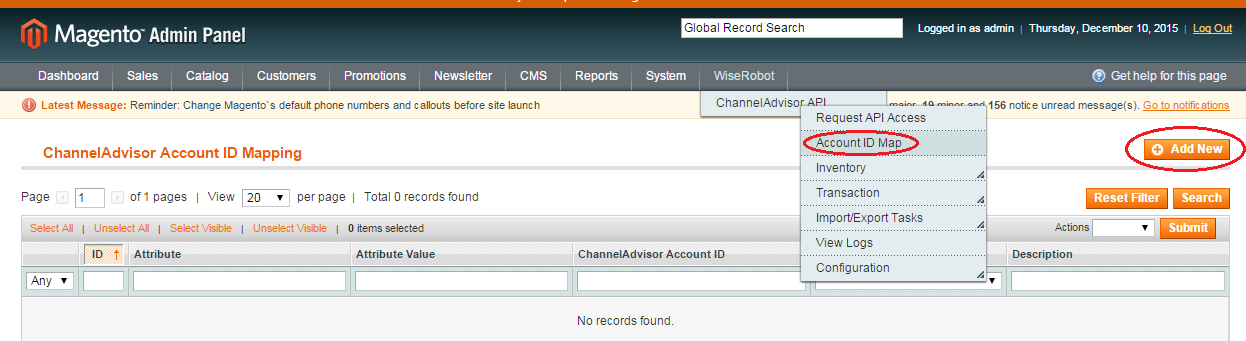
c. To get account ID (example for Color Attribute as selected)
- On the Magento Admin Panel, select WiseRobot → ChannelAdvisor API → Account ID Map
- On the Top-right corner, click on Add New button.
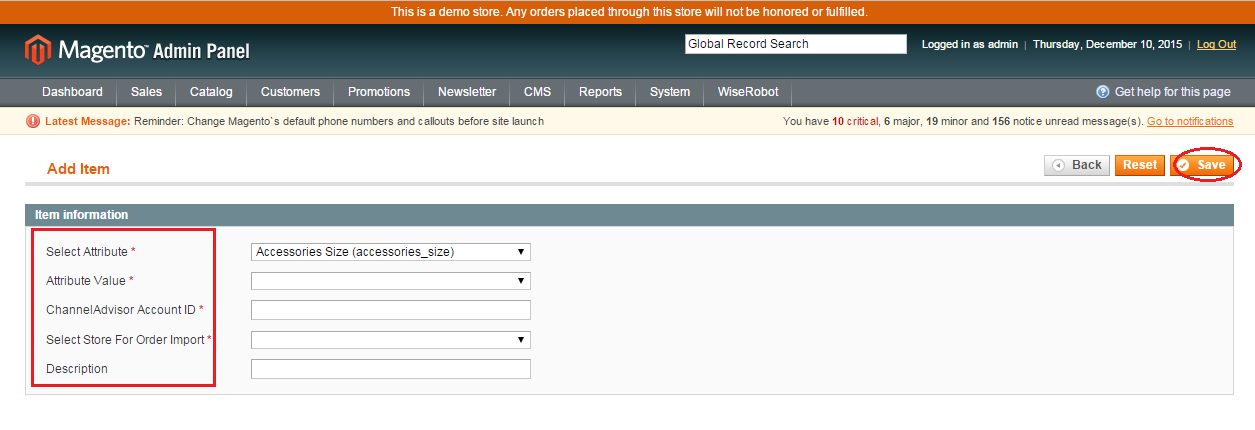
- In the Item Information section, complete the following required properties:
- Attribute value: modification of this value depends on which attribute you set in “Get Account Id from this attribute”. For example, you set this field as Color. Then attribute value is something like Black, White, Blue, and Red etc.
- ChannelAdvisor Account ID: fill in the Account ID which is taken from Account List section.
- Select Store for Order Import: choose the store view which you want to import orders into.
- Description (optional): in case you have many Account Ids, this field aids you to specify them.
- To finish mapping your Account ID procedure, you click on Save button at the top-right corner (using the example of Color Attributes above, any products with Black Color in English store view will be updated to ChannelAdvisor via the registered account ID which is also your test account).
Notes:
- Test mode and Test SKUs are designed to export or import only designated SKUs listed in Test SKUs from Magento to ChannelAdvisor (each SKU is distinguished from others by a comma)
- All products involved in the chosen attribute will be updated when any changes happen.
P-2. Export Orders to ChannelAdvisor
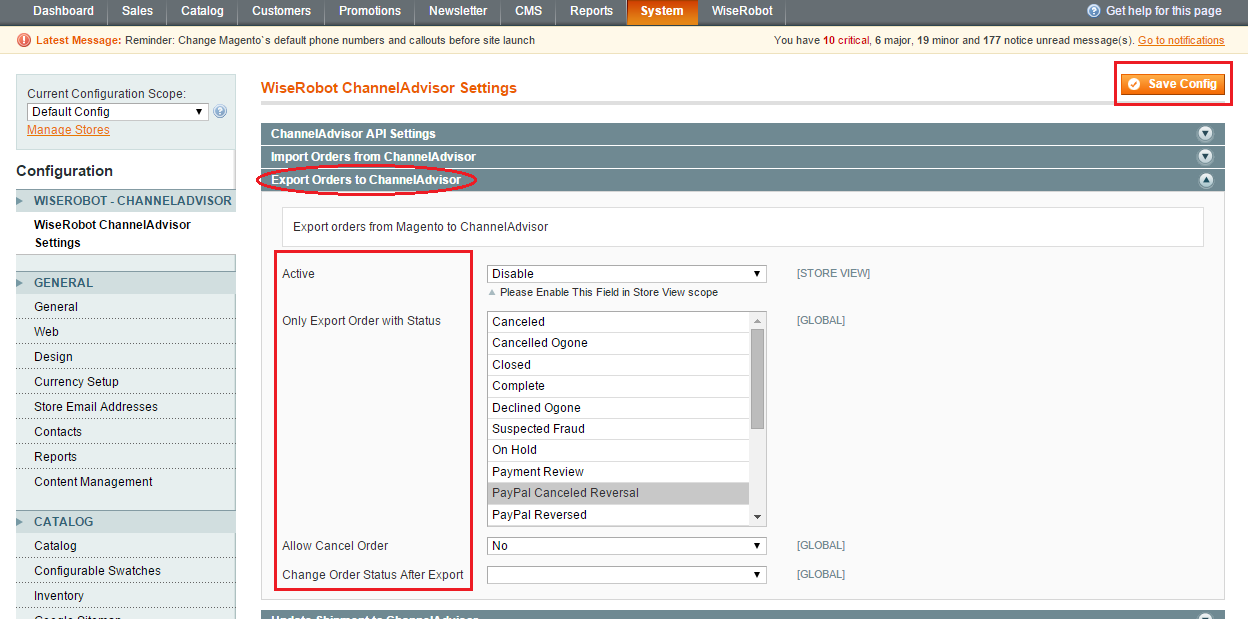
- To activate this function, set Active to
Enable
- Only Export Orders with Status: select one of the statuses in the table. An order will be exported to ChannelAdvisor when it is with the status following your selection.
- Allow Cancel Order: an order will be exported to ChannelAdvisor involving cancel orders.
- Chang Order Status after Export: the same meaning with the name
change order status after export
. Choose one of the statuses you want. - When finish, click on Save Config at the top-right corner.
P-3. Import orders from ChannelAdvisor

- To activate this function, set Active to
Enable
-
Set Only Import Shipment Information to:
-
Yes
order is imported or invoiced only after payment is received. No
all orders are imported before payment is received.
-
- Set Use Shipping Address as Billing Address when Billing Address is blank to:
Yes
shipping Address is employed as Billing Address when lacking Billing Address.No
simply leaves the Billing Address blank.
- To add prefix to order ID: Set Order ID prefix mode to:
- No prefix: use Magento default order number schema only.
- Prefix using Setting only: fill in the Order Id Prefix section the prefix you want to add to order ID.
- Prefix using Market place only: link the ID prefix market place to order number.
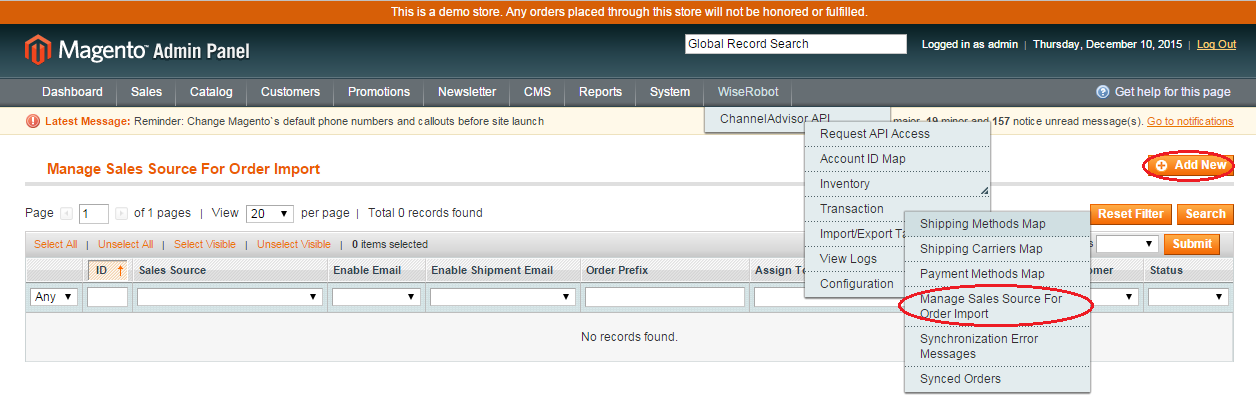
- On Magento Admin Panel, select WiseRobot → Channel Advisor API → Transaction → Manage Sales Source for Order Import (refer on P-10. Manage Sales Sources for Product Update Settings).
- In this page, choose the Sales Source that you want to add prefix such as Amazon.com, Amazon Webstore – UK, etc.
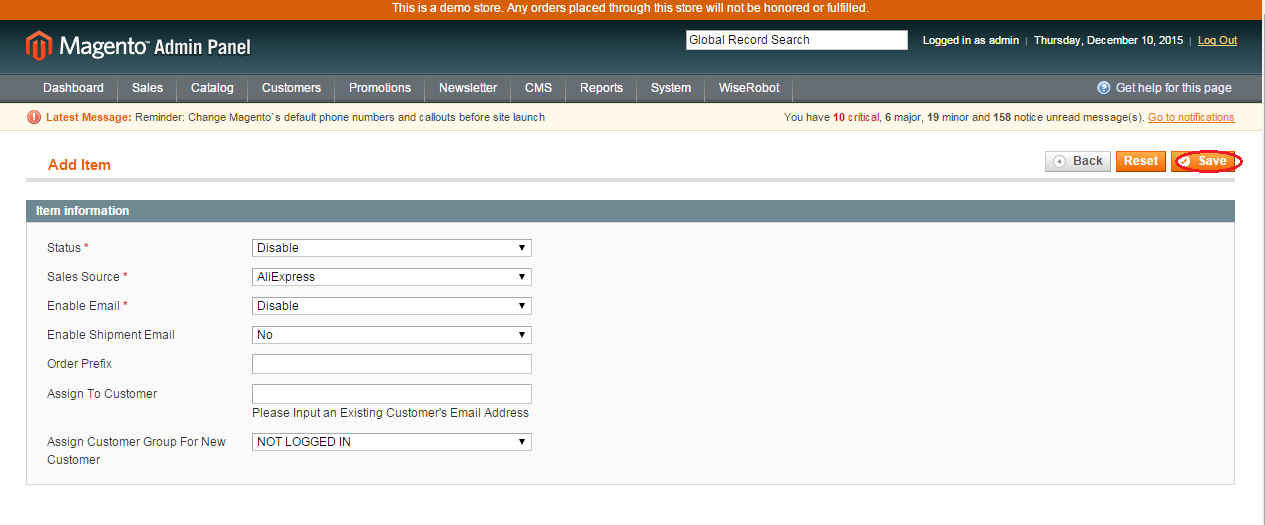
- Click on Add New button.
- Set Status to “Enable” to activate this application.
- In the Sales Source field, keep as it is or change to other sales sources.
- Set Enable Email to “Enable” if you want to receive the notification from the system that you've finished adding prefix to your order ID at chosen marketplace.
- Enter Order Prefix section the prefix you like such as AMUK standing for AMAZON_UK etc.
- When complete, click on Save button.
- Prefix using Setting and Market place: compromise between Setting and Market place sections above.
-
Set Import ChannelAdvisor Tax to Magento Tax to:
-
Yes
taxes are displayed on the Magento imported sales order. No
taxes are hidden on the Magento imported sales order.
-
- Set Frequency as needed: from every 5 minutes to every 6 hours. Frequency can be defined as a time frame set to manage how often import order processing occurs.
- Set Reduce stock when order imported to
Yes
to decrease the amount of stocks in Magento equal to the amount of stocks which are ordered by customers like order placed on Magento site. -
Set Use Two-letter Abbreviated Codes for the States to
Yes
to activate this function. (e.g. NA for North American, NC for North Carolina, etc). - Default Shipping/Payment Method: there are some shipping/payment methods for you to set as a default. To add, delete or create new shipping/payment method for order imported to Magento from ChannelAdvisor, you can find more information P-9. Shipping Methods Mapping and Payment Methods Mapping Settings.
- Skip update Order with status: when your order is currently in one of these statuses, it won’t be updated even if though there are any changes in the orders.
- When complete, click on Save Config button.
P-4. Update Shipment to ChannelAdvisor
The ChannelAdvisor connector allows you to update shipment details from Magento to ChannelAdvisor. When shipment is generated for an imported order, the tracking information and items shipped will be updated to ChannelAdvisor.
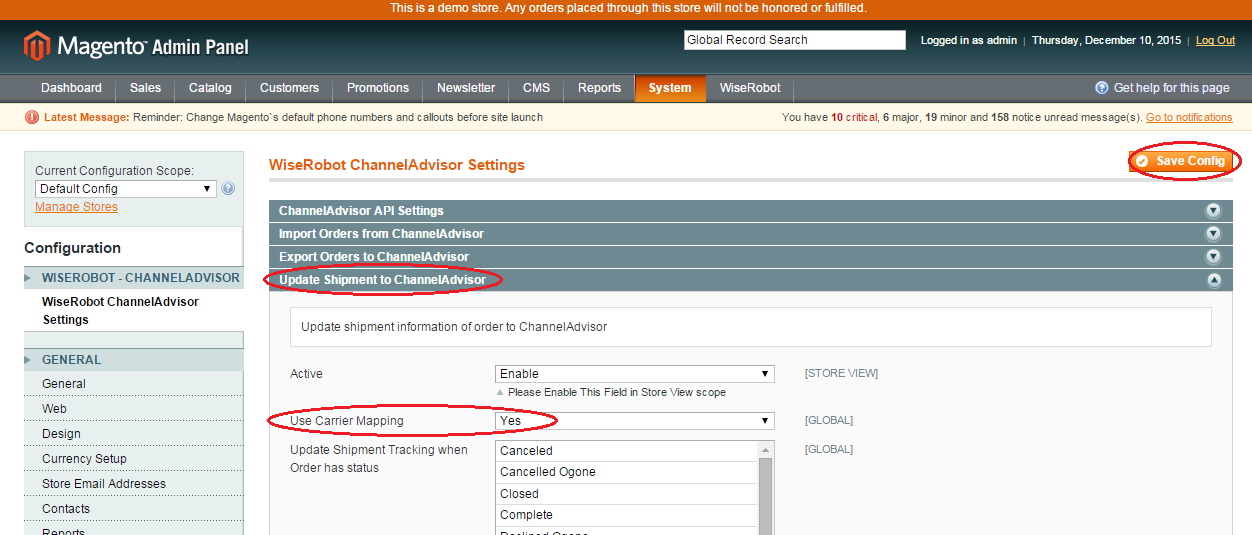
- Set Active to
Enable
for update shipment information to ChannelAdvisor. - Set Use carrier mapping to
Yes
→ click on Save Config and then do the following-
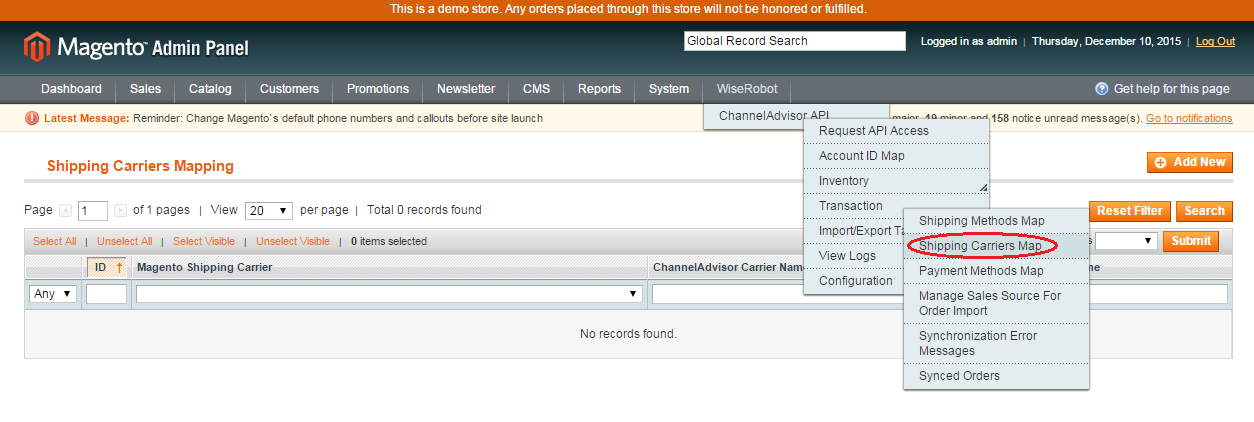
On Magento Admin menu, select WiseRobot → Channel Advisor API → Transaction → Shipping Carriers Map (this new menu item only appears when setting Use Carrier Mapping to
Yes
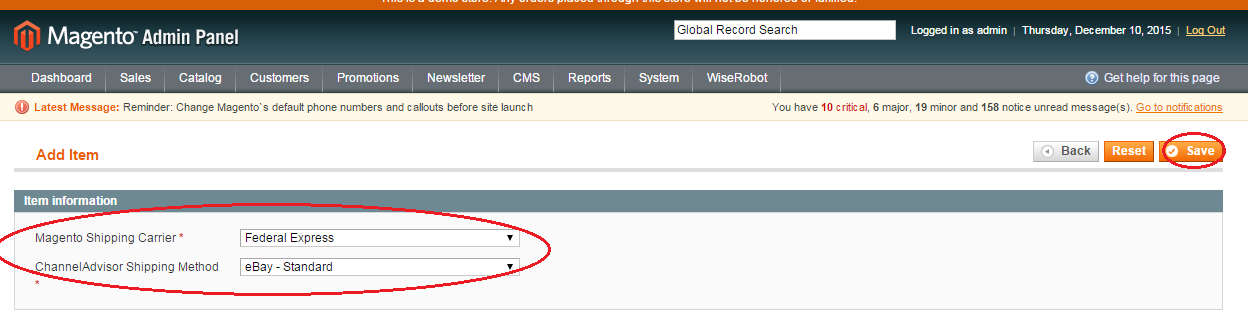
). - On the Shipping Carriers Mapping section, click Add New button and complete the required fields
- Select Magento Shipping Carrier such as Federal Express, DHL etc.
- Select ChannelAdvisor Shipping Method such as eBay - Standard, Newegg - One-Day Shipping etc.
- Completion of these fields means that you have just created a new mapping carrier which links the shipping carrier. Federal Express in Magento to the shipping method eBay - Standard in ChannelAdvisor.
- When complete, click on Save button.
-
On Magento Admin menu, select WiseRobot → Channel Advisor API → Transaction → Shipping Carriers Map (this new menu item only appears when setting Use Carrier Mapping to
- In Update Shipment Tracking when an Order has status section: select one of the current order statuses to update shipment tracking. For example, if you choose a current order with astatus such as “Complete” or “Canceled”, the shipment detail of this order will be updated to ChannelAdvisor accordingly.
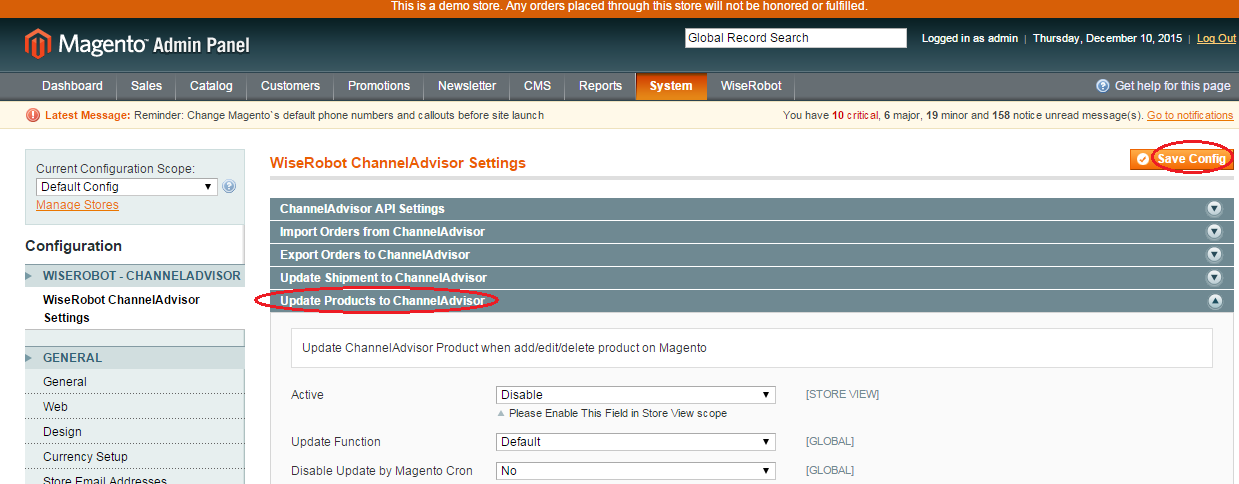
P-5. Update Products to ChannelAdvisor
This function allows you to update changes in products from Magento to ChanelAdvisor such as quantity of products, product descriptions, images etc.
-
Set Active to
Enable
to start updating product inventories from Magento to ChannelAdvisor. - Set Update function to:
- Default: updating products can be run immediately by Magento “Default” code.
- Exec Function: updating of products can be run by the php and exec function which requires the support from your server or hosting provider to enable the exec function if it’s currently disabled.
- Cron Job: updating products can be run as a user defined designated interval.
- Set Update mode to:
- Product Info Only: accurate, consistent and up-to-date information about product attributes are updated.
- Quantity Only: only the quantity of products is updated
- Product Info and Quantity: Both product information and quantity are updated to ChannelAdvisor.
- In the Attribute of Ignored Value & Ignored Value sections, you type a value into ignored value section after choosing one of the attributes of an ignored value. If a product has the similar attribute to your doing in the sections, it will not be updated to ChannelAdvisor.
- Set Quantity Update Type to
- Absolute: Available inventory = the quantity value uploaded.
- Relative: Available inventory = current inventory + uploaded inventory quantity.
- Available: Available inventory = the quantity value uploaded – Open (open auctions for this SKU).
- InStock: Available inventory = uploaded Inventory Quantity - Open - Pending Checkout - Pending Payment Cleared.
- UnShipped: Available inventory = uploaded Inventory Quantity - Open - Pending Checkout - Pending Payment Cleared - Pending Shipment (paid or unpaid).
- Set Allow Create New Product to
Yes
to generate new products to ChannelAdvisor in case data of these products are not available in ChannelAdvisor. -
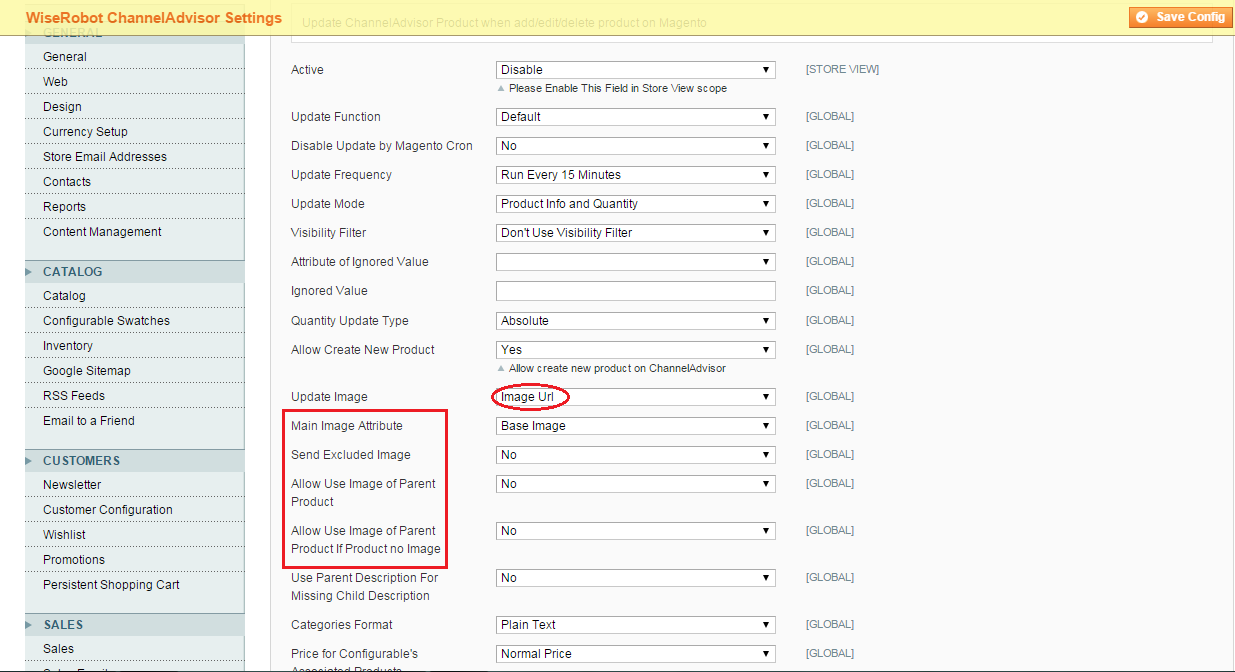
In the Update image field, you can decide an image that you would like to update via
Image Url
. By contrast, selectDisable
if you do not want to update any changes.- Main Image Attribute to set the size of the images.
- Set Send Exclude Image to
Yes
to ignore the images. - Set Allow Use Image of Parent Product to
Yes
to utilize image of parent product for child product. - Set Allow Use Image of Parent Product If Product no Image to “Yes” to utilize image of parent product for child product if the product does not have an image.
- Set Categories format to:
- Plain Text: Categories are formatted in Plain text.
- Array as Json: Categories are formatted in Array as Json.
- Set Use Parent Description for Missing Child Description to “Yes” to employ the description of parent product for its missing child product.
- Set Price for Configurable’s Associated Products to:
- Normal Price: a product itself is priced by its normally setting price.
- Calculate from Super Product Configuration: a product is priced following its parent product price.
- In the Delete Product on Magento Will Also Delete on Channeladvisor section, select:
- “Yes” allowing you to delete products on Magento and ChannelAdvisor simultaneously.
- “No” deleting products on Magento have not affected on the amount of products on ChannelAdvisor.
- Set Delete Disable Product to
Yes
to eliminate disabled products. - In the Stock for Dropship Item field, enter the default stock quantity for dropship items for your current product status.
- Set Out of Stock Product Send Stock Level 0 to “Yes” means the stock level equals 0 when your products are out of stock in order to disable on ChannelAdvisor.
- Set Disable Product Send Stock Level 0 to
Yes
to avoid any inconveniences for clients if your products run out of stock. - In the Distribution Center Code field, enter the distribution code.
- In the Default Condition section, choose default condition status such as New, Used, Reconditioned and Refurbished for your all products in your web-store.
P-6. Setting for Configurable/Grouped Products
Configurable and Grouped Products can be loaded from Magento to ChannelAdvisor by following these steps
- Getting the relationship name from corresponding variations on ChannelAdvisor.
- Change settings to allow update configurable/grouped products into variations on ChannelAdvisor.
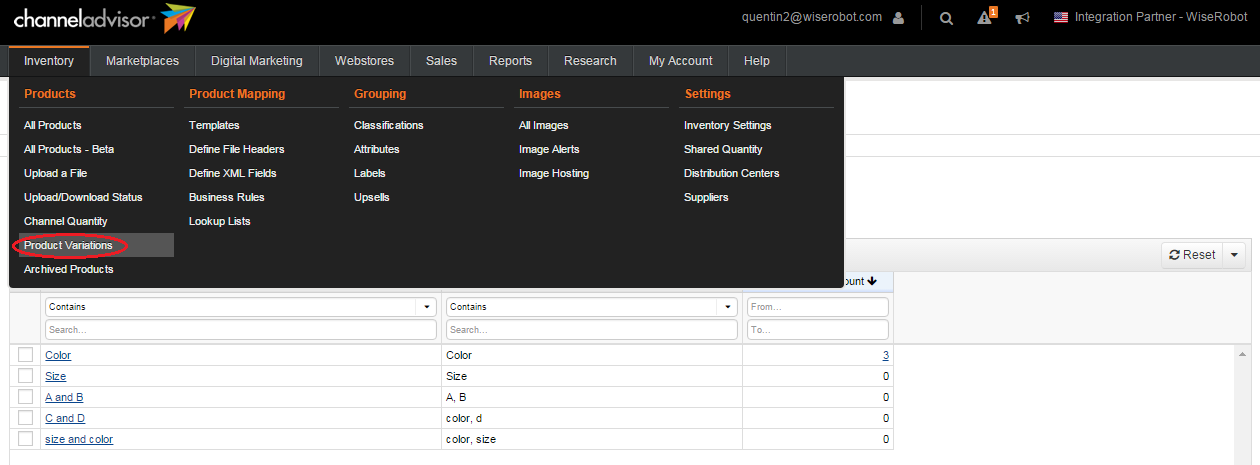
1. Step 1 - Getting the relationship name from corresponding variations on ChannelAdvisor
Using your browser, navigate to the ChannelAdvisor Client Logging Panel. The URL is Click here.
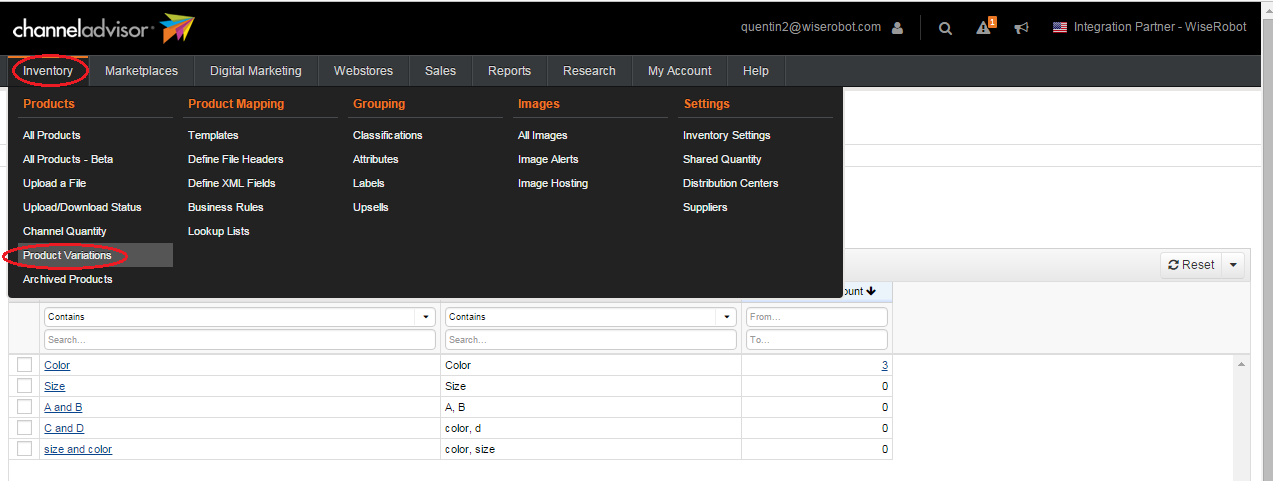
- Enter your User name and Password
- On the admin menu, select Inventory → Products → Product Variations
2. Step 2 - Change settings to allow update configurable/Grouped products into variations on ChannelAdvisor
Go back to the Settings for Configurable/Grouped Products page from Magento
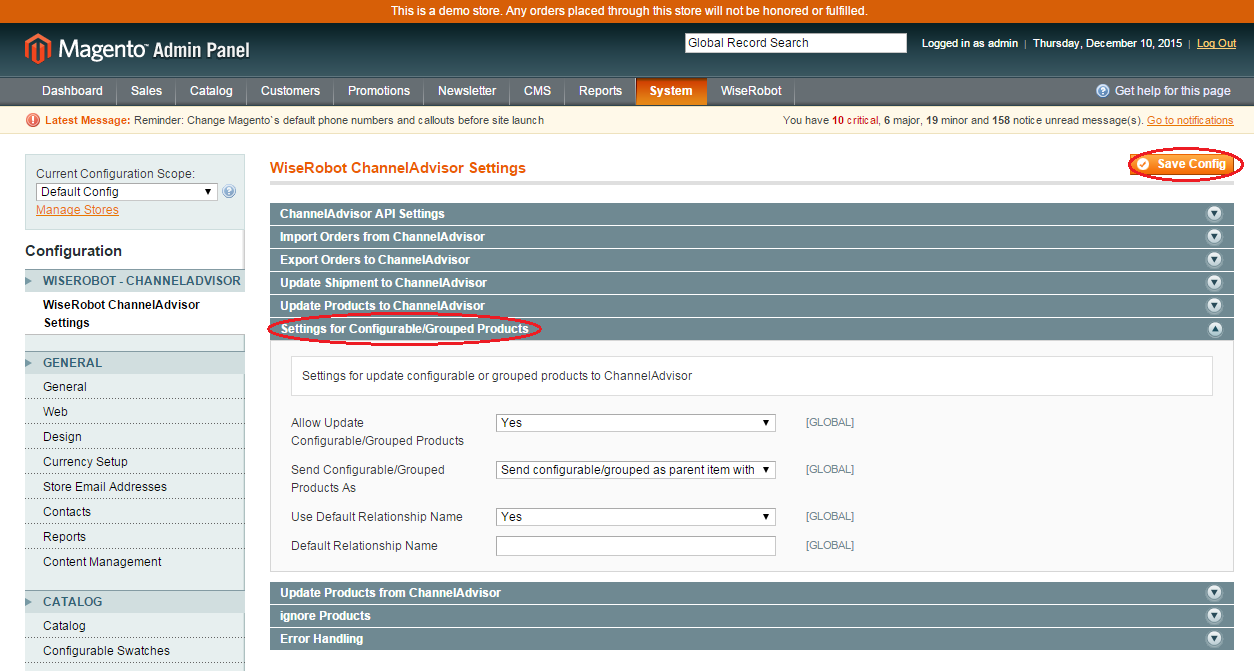
- Set Allow Update Configurable/Grouped Products to “Yes”.
- Then, the Send Configurable/Grouped Products As will appear. Set this field to “Send configurable/grouped as parent item with relationship”.
- Set Use Default Relationship Name to “Yes”. In this section, entering the Default Relationship Name you have taken from step 1 in the list name of Product Variations such as Color.
- When complete, click on Save Config button.
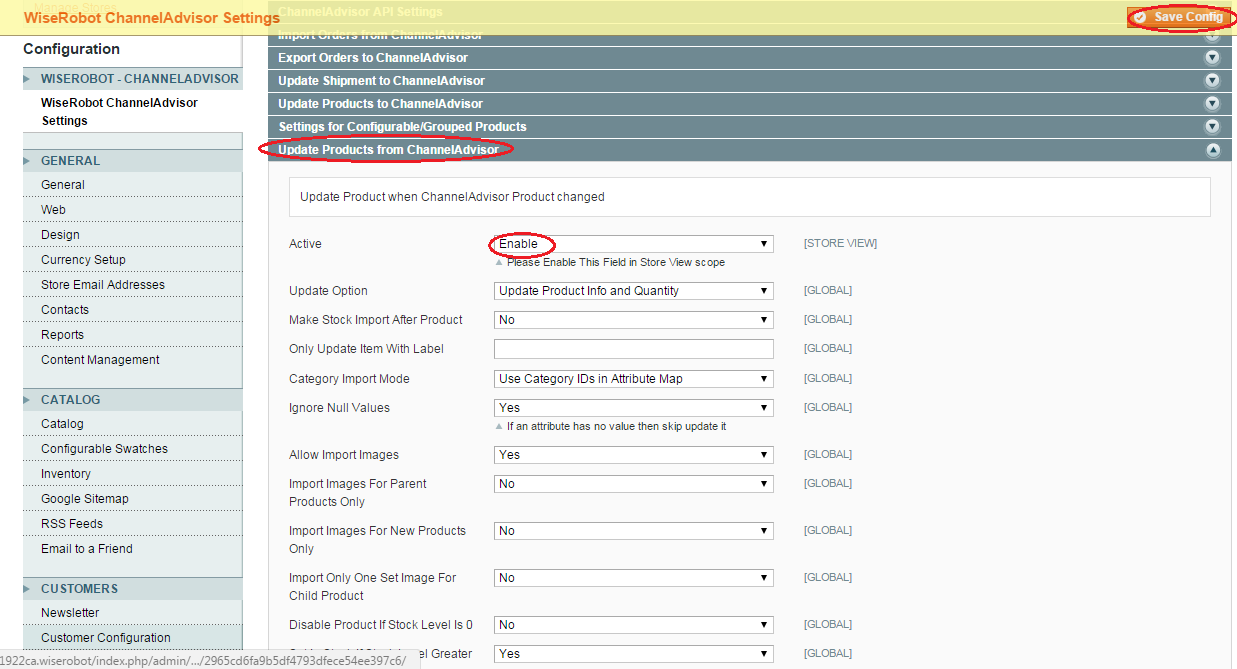
P-7. Update Products from ChannelAdvisor
In accordance with the features of the ChannelAdvisor to Magento Connector, our module can help you to transfer products and order information reciprocally. If changes in products on ChannelAdvisor are found, our module will update these changes from ChannelAdvisor to Magento. Hence, the product information in both ChannelAdvisor and Magento will be updated if this function is also enabled as well as updating Magento to Channel advisor, as well as this if desired one way communication from ChannelAdvisor to Magento can be enabled here.
-
Set Active to
Enable
to activate updating products from ChannelAdvisor. - In the Only Update Item with Label field, enter an item label. This means that only items with the given labels will be updated to Magento.
-
Set Update Option as needed to
Update Product Info and Quantity
,Update Quantity Only
andUpdate Product Info Only
-
Set Allow Import images to
Yes
to import item’s images from ChannelAdvisor to Magento. -
Set Ignore Null Values to
Yes
if an attribute has no value then skip its update. - In the Category Import Mode section, there are two methods to import your categories. Please find more information at section C. Wiserobot Tab Settings – P-7. Category Import Methods Settings.
- Set Set in Stock If Stock Level Greater Than 0 to
Yes
. If the quantity of a product is greater than 0, its product status will be appearedin stock
. - Set Disable Product If Stock Level Is 0 to
Yes
. If the quantity of a product is 0, its product status will be disabled. -
Set Allow Create New Product to
Yes
to generate new products on Magento, in case; data of these products are not available on Magento. -
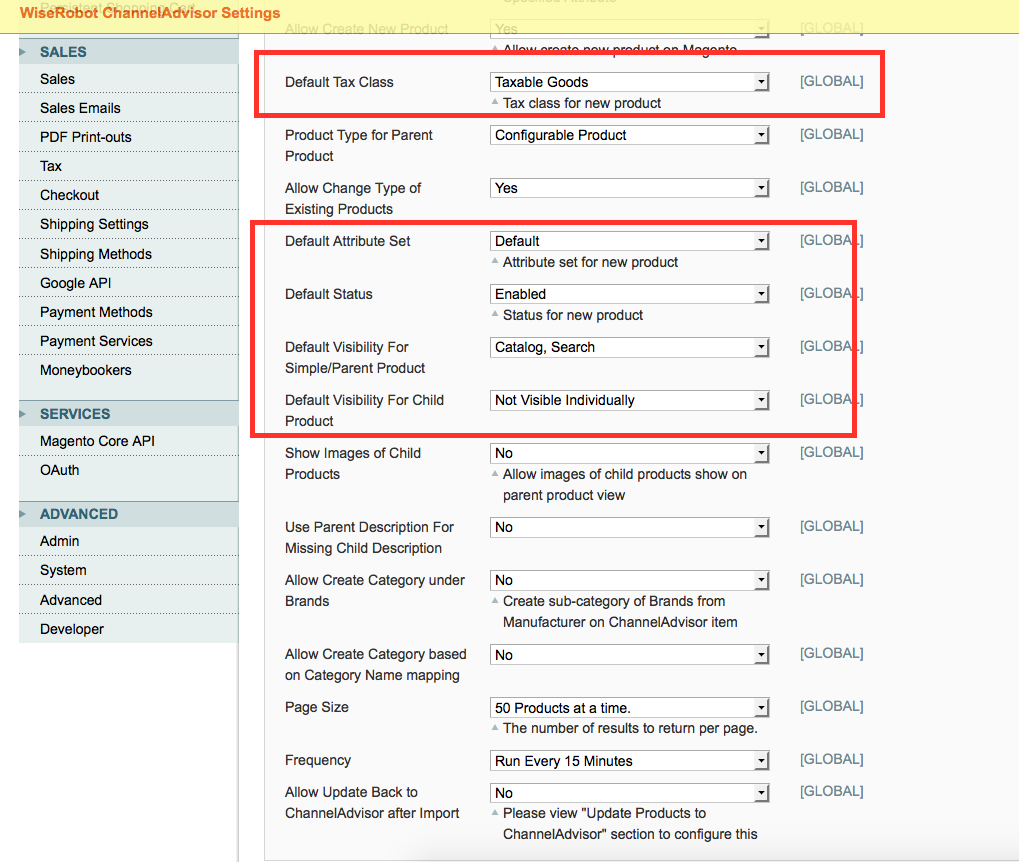
In the Default Tax Class section, you can choose one of the default classes that are set up in the Magento:
- None
- Taxable Goods
- Shipping
- Tax Exempt
- Set Product Type for Parent Product to
Configurable product
if you want to import parent product. By contrast, set it toGrouped product
. - In the Default Attribute Set field, choose an attribute that you want to make it as a default when updating new product.
- Set Default Status to “Enable” and then new product status will show up on the front-end page
-
In the Default Visibility for Simple/Parent or Child Products section, do:
- Catalog: your new products will be displayed on a catalog list.
- Search: your new products will be showed on search mode
- Catalog, Search: your new products will be exposed on both a catalog list and search mode.
- Not Visible Individually: your new products will be hidden on the catalog list and search mode.
-
Set Show Image of Child Products to
Yes
to allow images of child products to show on parent product view. - In Page Size section, select the amount of products that you want to test at a time.
- In Frequency section, select a designated time frame as needed.
- When you finish, click on Save Config button at the top-right corner.
P-8. Ignore Products
Activating this function will allow you to ignore updating some products from Magento to ChannelAdvisor and vice versa.
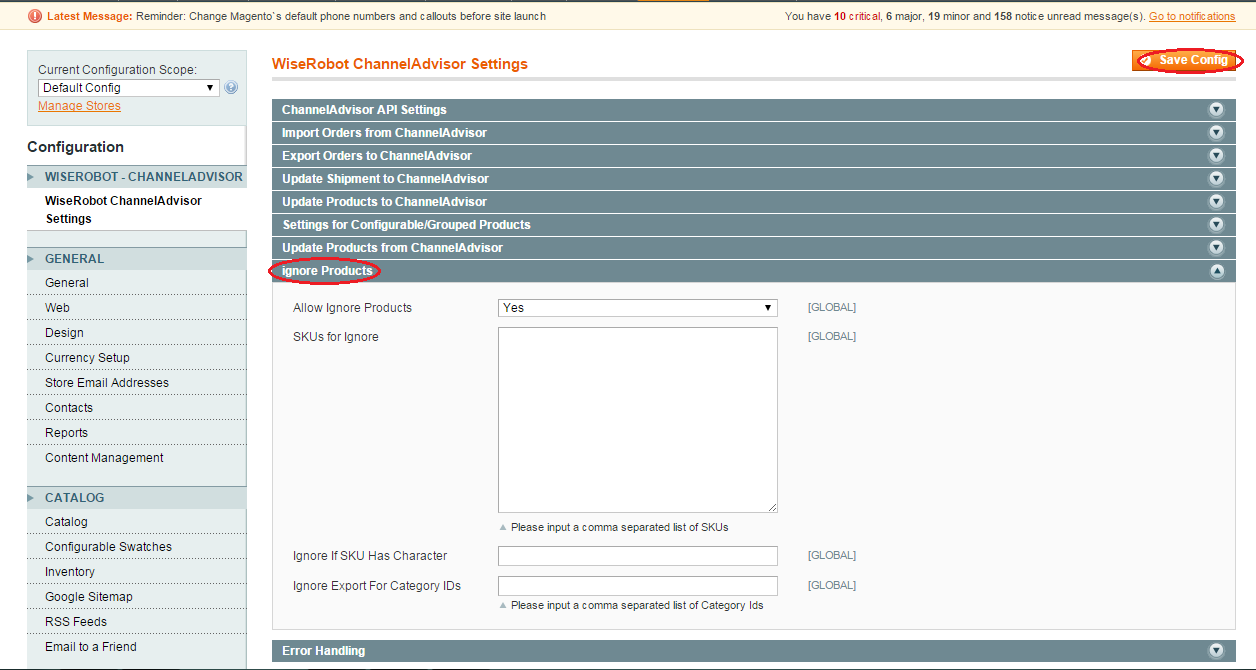
-
Set Allow Ignore Products to
Yes
to enable this function. - In the SKUs for Ignore section, enter the SKUS in this field. These listed SKUs will be skipped throughout updating-product process. Please, input a comma to separate each single SKU.
- In the Ignore If SKU Has Character field, any SKUs containing listed characters will be ignored throughout updating-product process.
- In the Ignore Export for Category IDs field, any products containing listed category ids will be ignored and not updated to ChannelAdvisor.
- When you finish, click on Save Config button at the top-right corner.
P-9. Error Handling
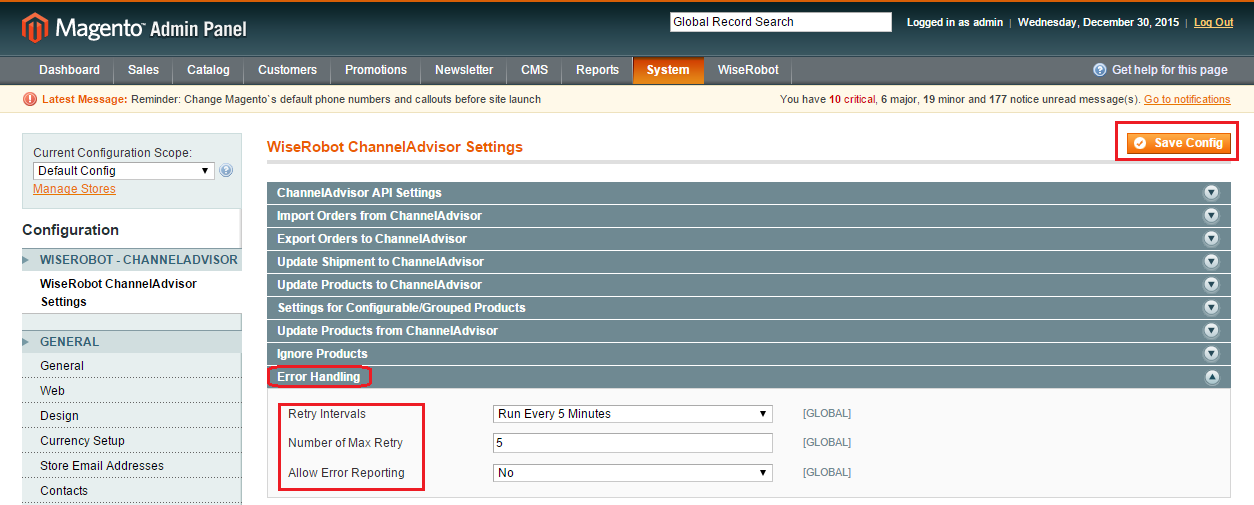
- Retry Intervals: the system will solve problems in order to send a notification to you about the issues. Choosing the time you want it to do this function when the issue happens
- Number of Max Retry: the system will try to solve problems with the times that are typed in this section.
- Allow Error Reporting: the system will report the error to you if you choose
Yes
.
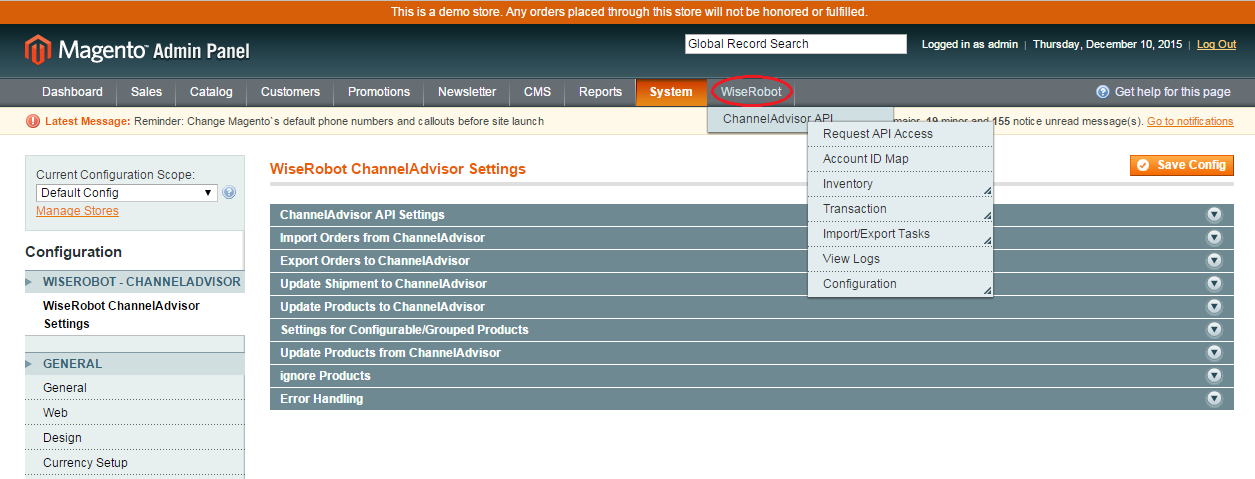
new admin menu is wiseRobot
On the Magento Admin Panel, navigate WiseRobot → ChannelAdvisor API
From ChannelAdvisor API, there is a drop-down list comprising of settings such as Request API Access, Account ID Map, Inventory, Transaction, Import/Export Tasks, View Logs, and Configuration respectively.
P-1. Request ChannelAdvisor API Access
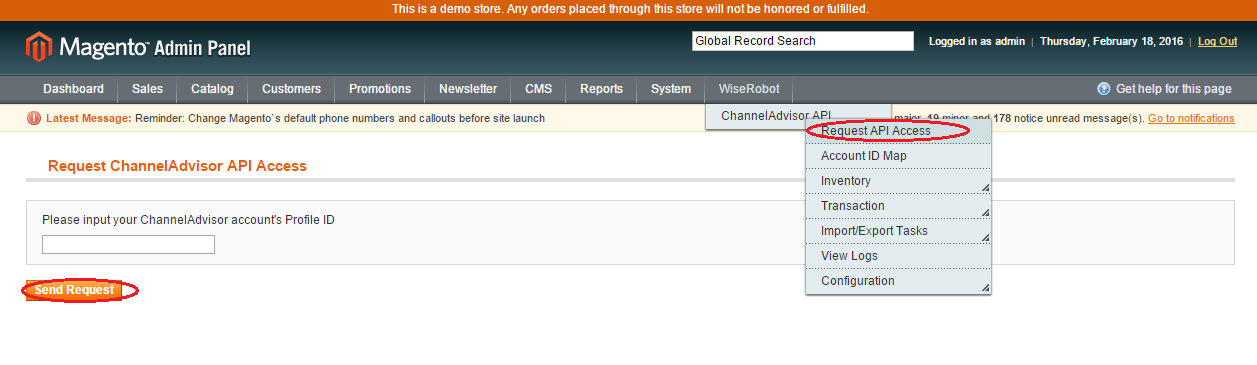
On the Magento Admin Panel, select WiseRobot → ChannelAdvisor API → Request API Access
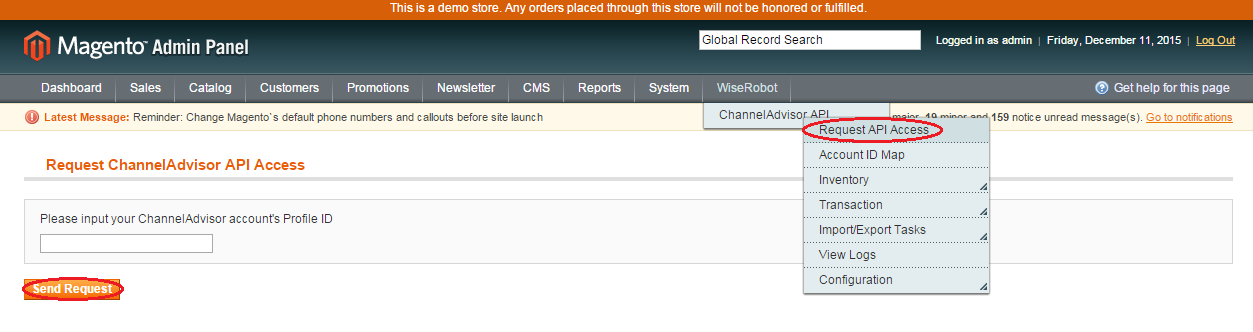
- Enter your account’s profile ID (refer on P-1. ChannelAdvisor Settings – Step 1: Request and authorize a Developer Key – 2. To have your Developer Key authorized).
- Click on Send Request button after finishing.
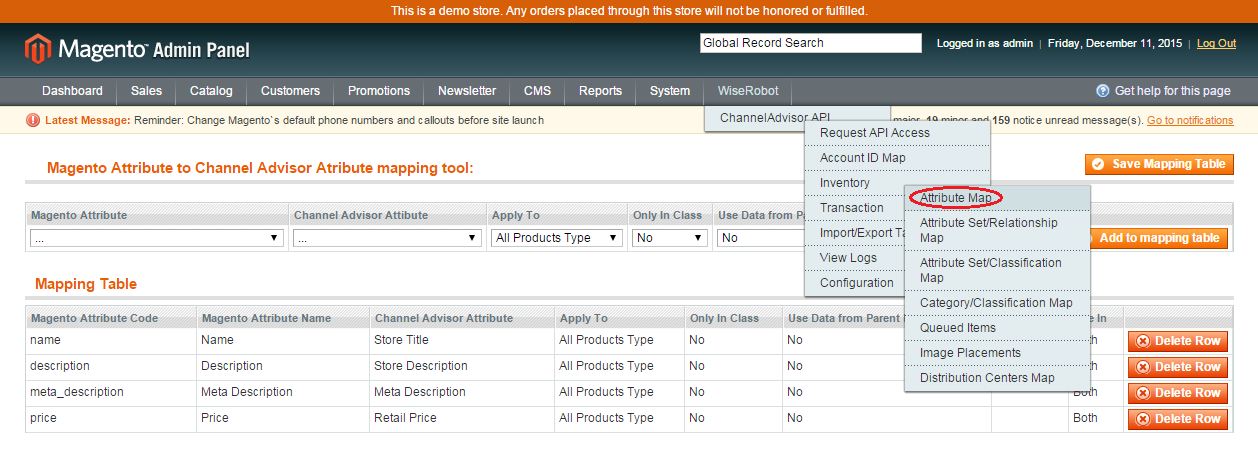
P-2. Attribute Map
Our connector module has a mapping tool to aid you map the attributes from Magento to ChannelAdvisor accurately and easily.
* To set attribute map from Magento to ChannelAdvisor
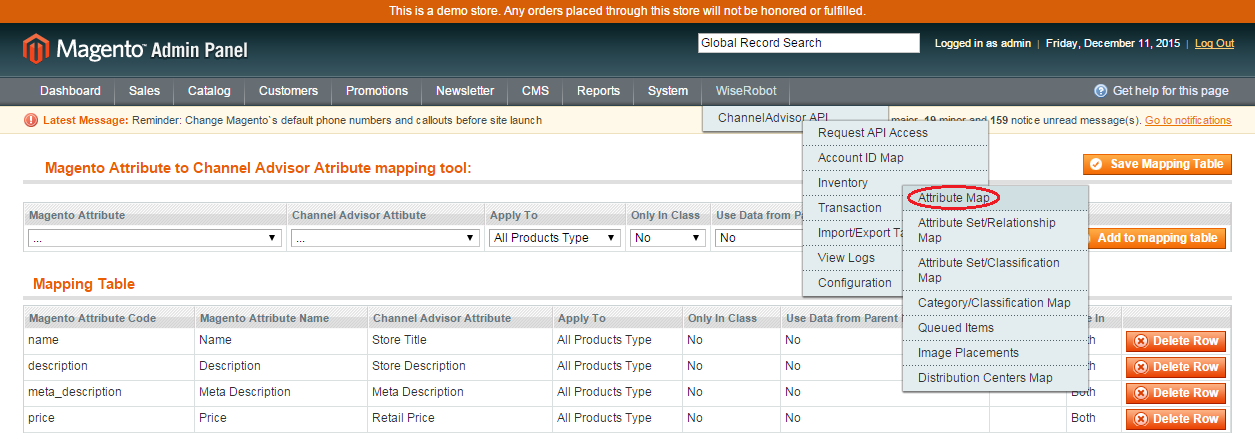
On the Magento Admin Panel, select to WiseRobot → ChannelAdvisor API → Inventory → Attribute Map
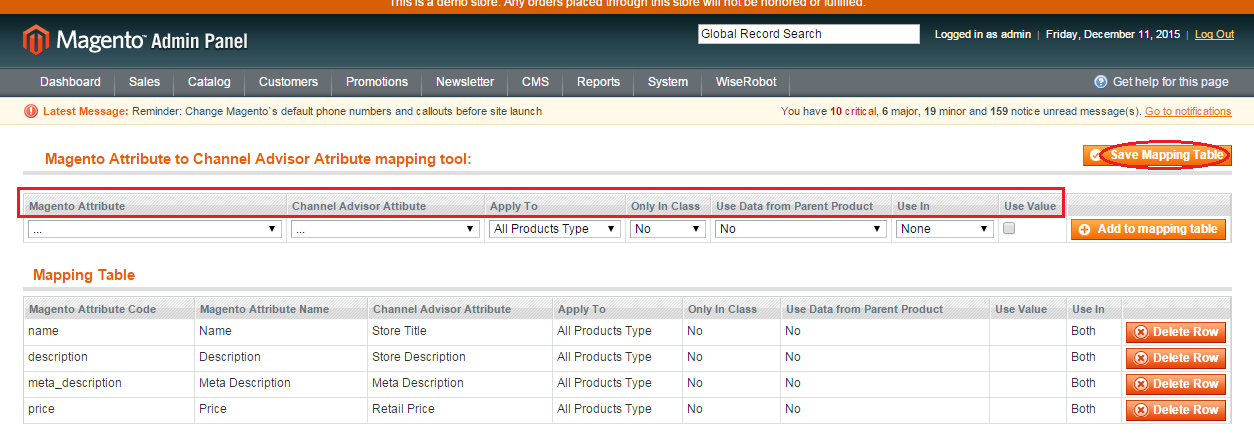
Click to expand this tab and complete these following fields
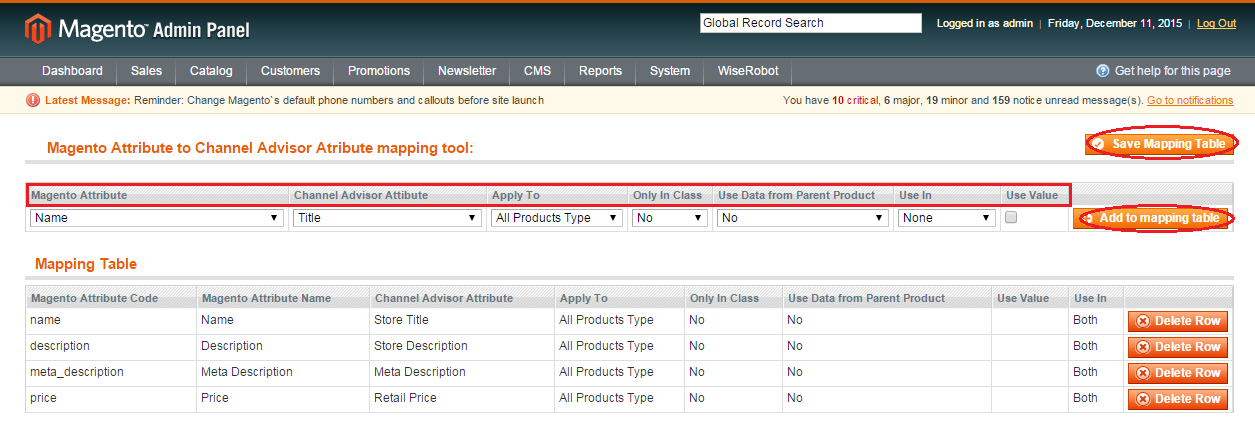
- In the Magento Attribute and Channel Advisor Attribute sections, choose the product attributes. Those attributes are available in both Magento and ChannelAdvisor. By selecting one attribute in Magento Attribute in this list and map it to one respective attribute in ChannelAdvisor, you can generate a Mapping Table to update and synchronize data between Magento and ChannelAdvisor. (For example: Mapping an attribute “Name” in Magento to an attribute “Title” in ChannelAdvisor).
- In Apply To field, pick one of four product types: All Product Types, Parent Product, Child Product, and Simple Product. Then, the synchronization between Magento and ChannelAdvisor will be applied to the type of product you choose.
-
Set Use Data from Parent Product to:
-
Yes
allows updating data such as Name, Price, Description, Image etc. from Parent Product (in case, the product type is Child Product). -
No
Child Product will get data by itself, not from Parent Product.
-
-
Set Use in to:
Export only
product's attributes will be updated from Magento to ChannelAdvisor.-
Import only
product's attributes will be updated from ChannelAdvisor to Magento. -
Both
product's attributes will be updated both ways. -
None
product's attributes will not be updated either from Magento or ChannelAdvisor.
- Select the check box in Use Value section, one new text box “Value” will appear and the column “Use Data from Parent Product” will disappear. It means that instead of getting data from product's attributes, you can make it for your own by inputting data. Since, there are some differences between Magento and ChannelAdvisor. This function may be useful.
- To finish Mapping your Attributes, click on Add to Mapping Table button as well as please do not forget to click on Save Mapping Table button to save your changes.
Notes:
You should know product characteristics’ name in Magento Attribute Code, Magento Attribute Name and Channel Advisor Attribute respectively in order to map them accurately. If you would like to help mapping your attributes please contact us at [email protected].
P-3. Attribute Set Mapping Settings
In ChannelAdvisor, you can only get relationship name
, “parent” or is_parent
, etc. but you won’t know which attributes are in parent-child relationship. Therefore, this section will help you clarify these relationships when creating a configurable product.
Thanks to the product relationship, if it is a parent item, it will be converted to a corresponding configurable product when importing products to Magento.
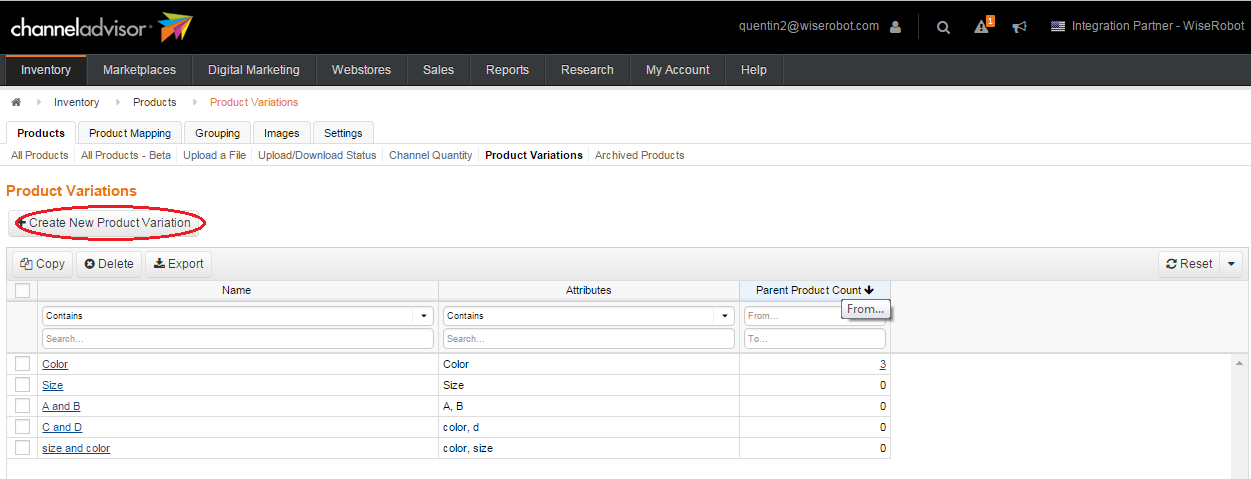
1. To Create Variations on ChannelAdvisor
a. Step 1
- Using your browser, login to ChannelAdvisor Admin Panel
- On the Admin Menu, navigate to menu Inventory → Product Variations
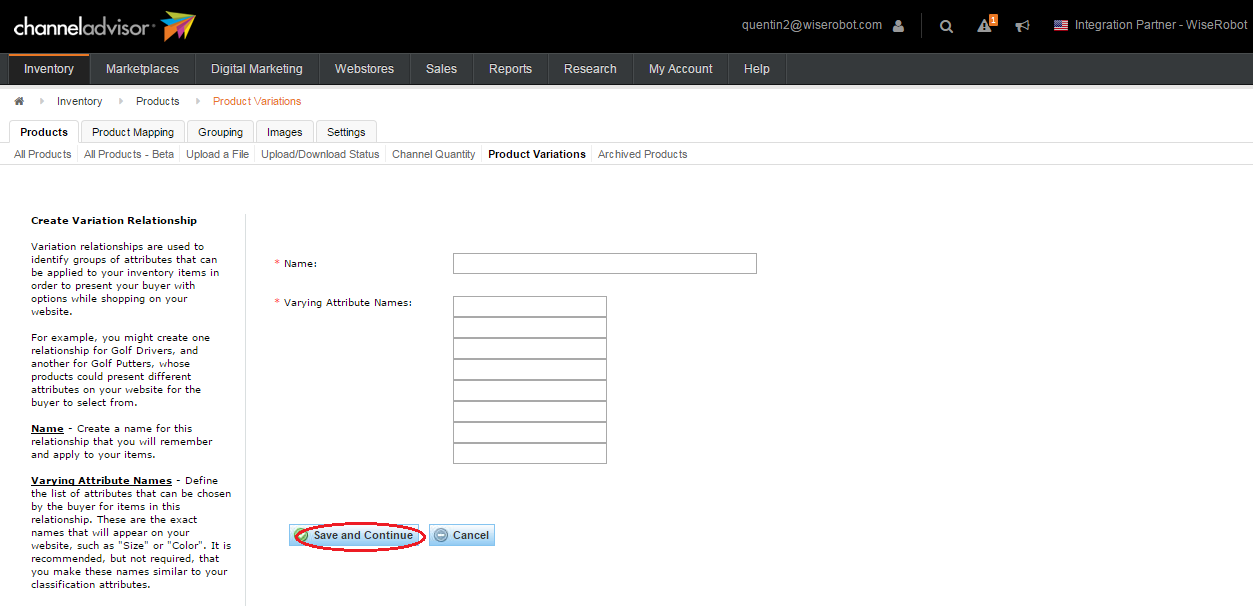
- On the top-left corner, click to expand Create New Product Variation
- Name: enter the relationship name such as Color and Size etc
- Varying Attribute Names: enter product attributes which belong to this relationship such as Size, Color etc
- When finish, click on Save and Continue button
b. Step 2
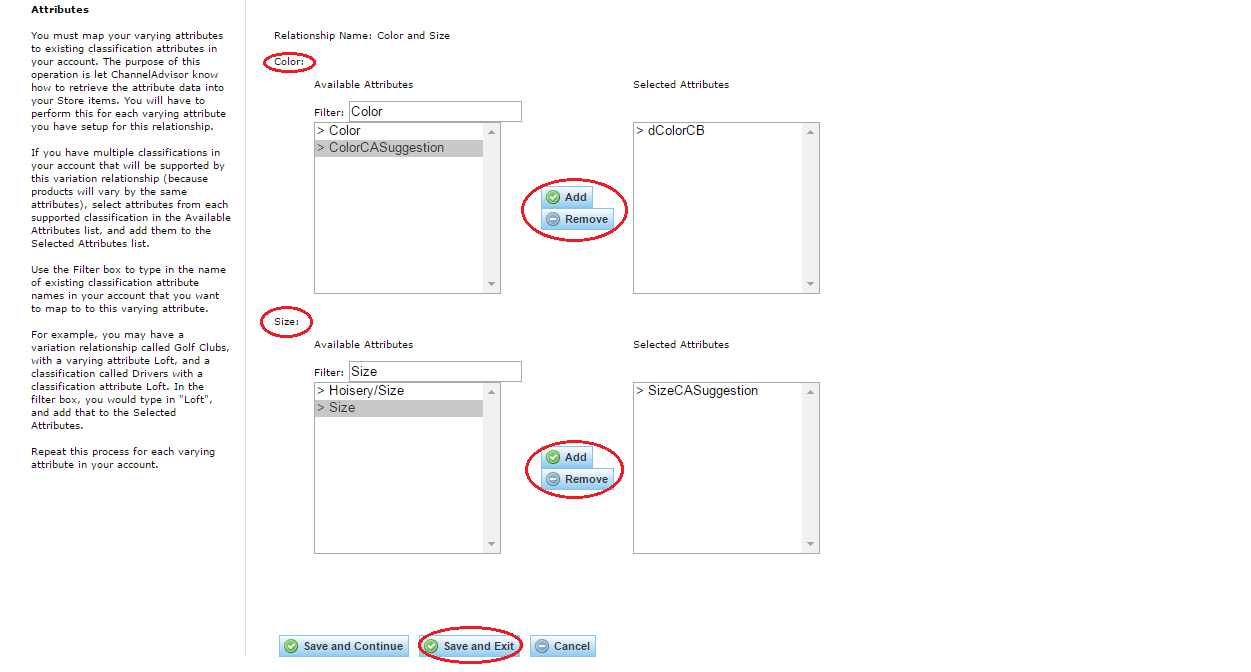
Mapping the variation attributes to the specific classification attributes
- Each varying attribute name you defined in step 1 (indicated in red below) needs a real product attribute to have its value. Hence, you need to select an attribute for each of them (selected attributes are indicated in purple below).
- You can select the attributes you want to map from Available Attributes list, use the Filter to get the attribute quickly, then click Add button to select it.
- Then, you click Save and Exit button to finish.
2. To map the attribute set in Magento to a ChannelAdvisor variation
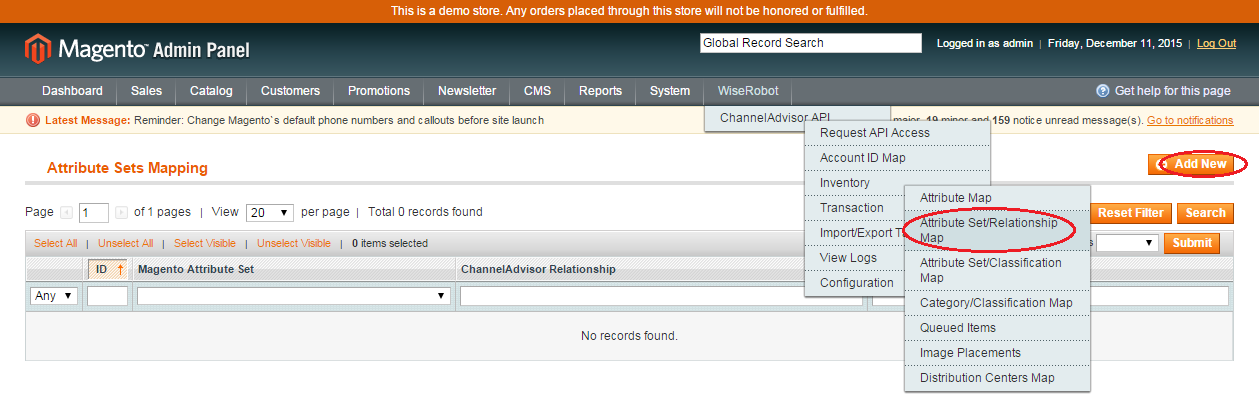
- On the Magento Admin Panel, select WiseRobot → ChannelAdvisor API → Inventory → Attribute Set/Relationship Map
Click to expand Add New button on the top-right corner
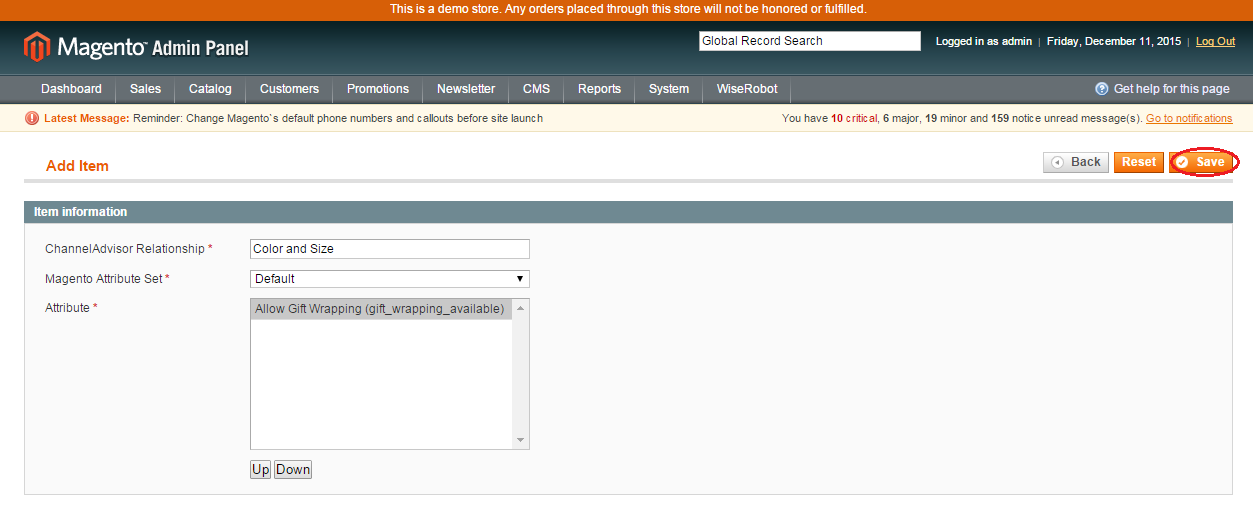
- ChannelAdvisor Relationship: enter the Relationship you created on ChannelAdvisor (e.g. Color and Size etc.)
- Set Magento Attribute Set to “Default”
- Attribute: choose the attributes are associated with the relationship.
- When complete, click on Save button.
Here how it works:
When a configurable product is sent to ChannelAdvisor, the module will get attribute set and configurable attributes from that product in order to check with the mappings to find if a ChannelAdvisor Relationship was defined. For example, if that product attribute set is Default and use configurable attribute FS Color and FS Size, from the mapping at the screen shot above, we have relationship Color and Size. Then, the configurable product and its associated products will have that relationship set correctly on ChannelAdvisor.
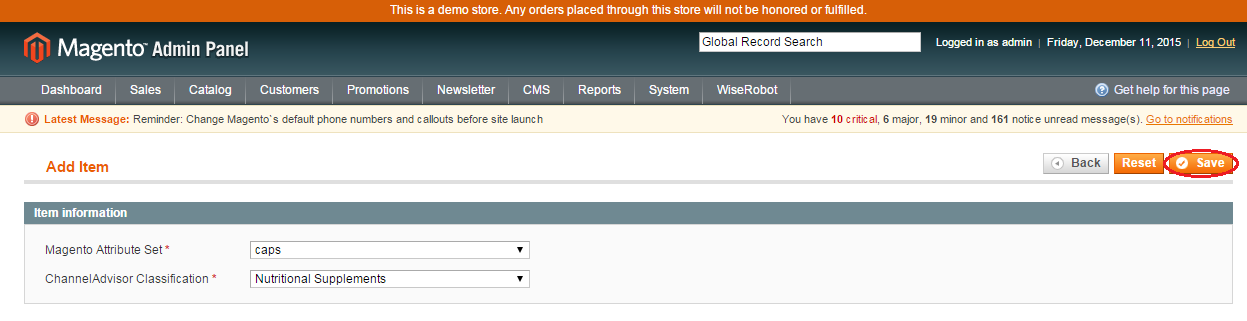
P-4. Attribute Set/Classification Map
This function will export attribute set to ChannelAdvisor regarding to classification which you desire. When products are created in Magento, they need to be declared in order to know the products having attributes.
On the Magento Admin Panel, select WiseRobot → ChannelAdvisor API → Inventory → Attribute Set/Classification Map
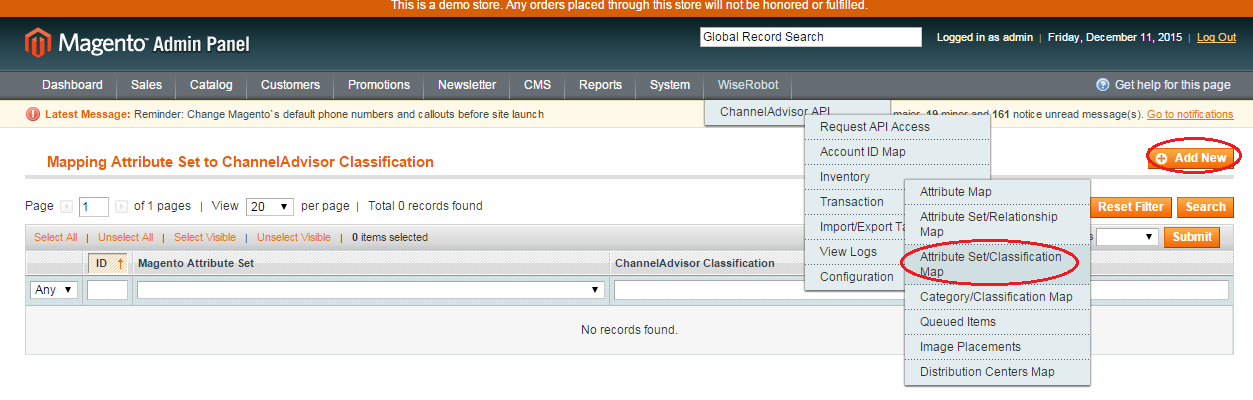
- Click on Add New button
- Magento Attribute Set and ChannelAdvisor Classification sections: choose one of the optional list.
- Click on Save button when finishing.
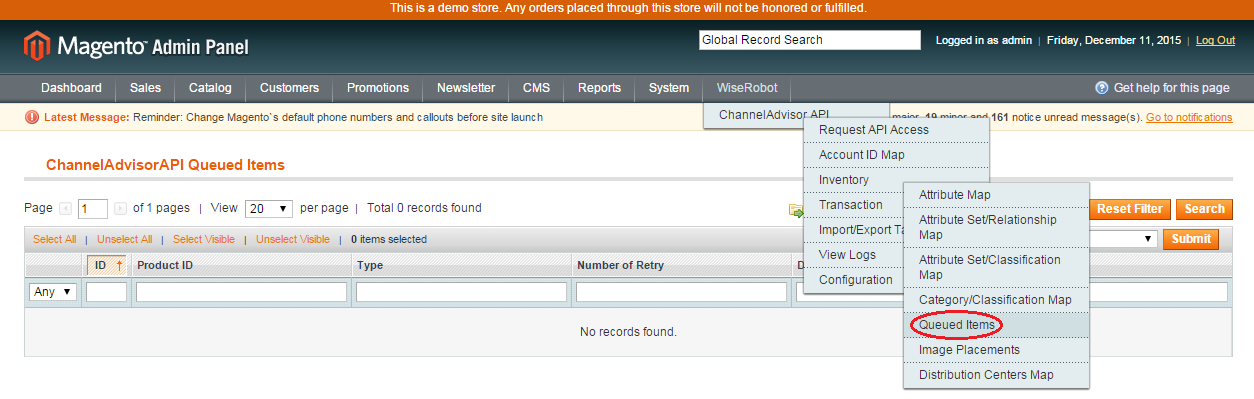
P-5. Queued Items
When products are failed to update to ChannelAdvisor with any reasons, they will be added to the queued items page in order to announce this process to you. The failed update products will also be updated again to ChannelAdvisor in a short time later or you can manually update the products to ChannelAdvisor.
On the Magento Admin Panel, select WiseRobot → ChannelAdvisor API → Inventory → Queued Items
P-6. Distribution Centers Map
This function helps you to manage products of warehouses in different areas (i.e. the quantity of a product in different warehouses).
On the Magento Admin Panel, select WiseRobot → ChannelAdvisor API → Inventory → Distribution Centers Map
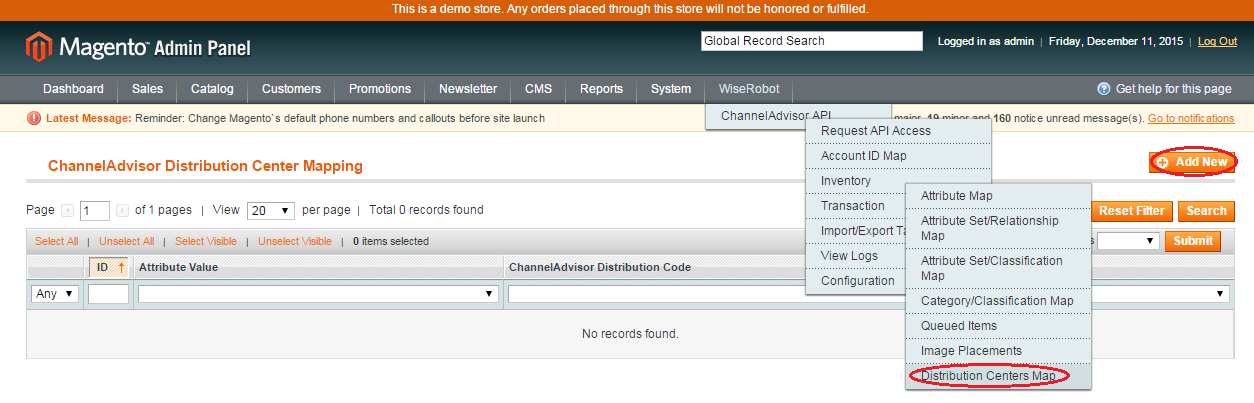
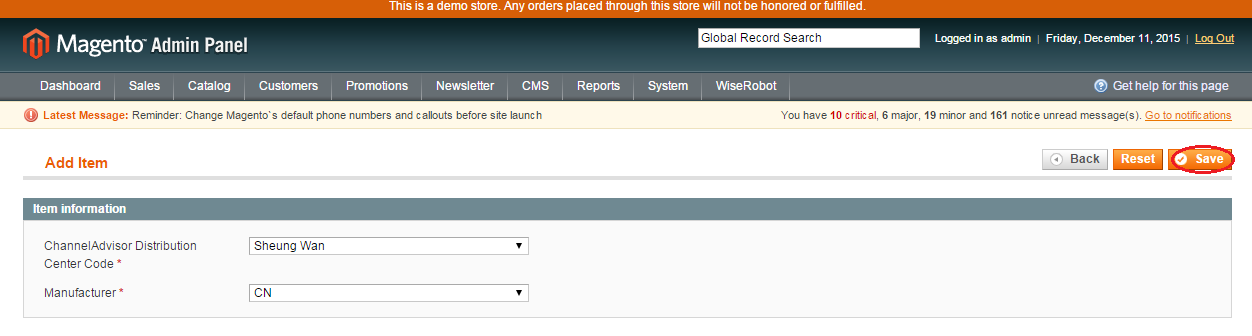
- Click on Add New button
- ChannelAdvisor Distribution Center Code and Manufacturer sections: choose one of the optional list.
- Don’t not forget to click on Save button when complete.
P-7. Category Import Methods Settings
Before importing category methods in ChannelAdvisor to Magento, you need to set up categories in Magento first.
* To set up Categories in Magento
On the Magento Admin Panel, navigate to Catalog → Manage Categories. In the New Root Category page, complete the required fieldsName, Is Active, Thumbnail Image, Description, Image etc. When finished, click Save Category.

There are three methods to import categories from ChannelAdvisor to Magento.
a. Method 1 - Use Category IDs in Attribute Map
* Step 1 - Create an attribute in ChannelAdvisor
- Using your browser, navigate to the ChannelAdvisor page
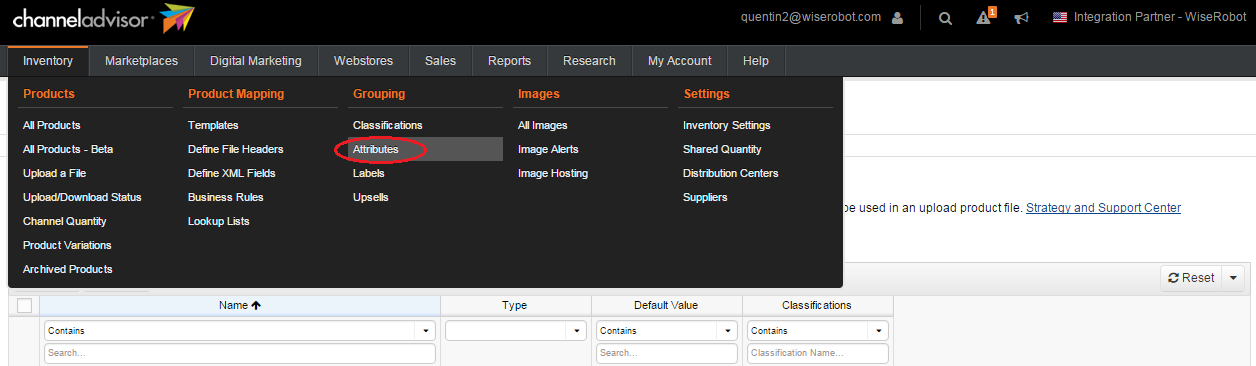
- On the Admin menu, select Inventory → Grouping → Attributes
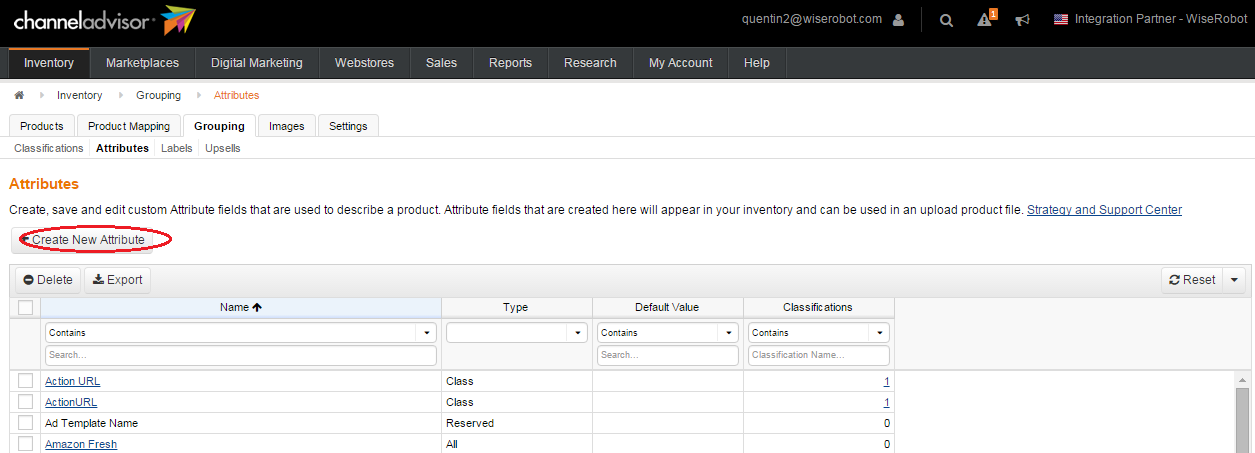
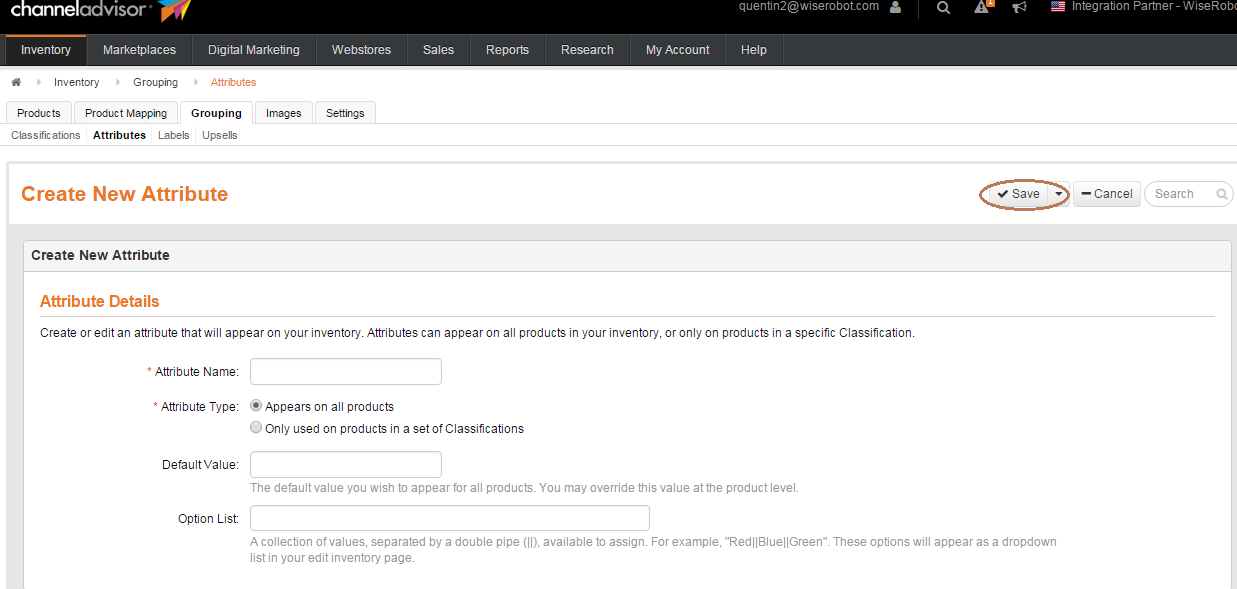
- In the Attributes page, click Create New Attribute button and complete the following
- Attribute Name: fill the name of an attribute that will appear on your inventory.
- In Attribute Type section, select “Appears on all products” or “Only used on products in a set of Classifications”
- When complete, click Save button at the top-right corner.
* Step 2 - Map Magento Attribute to ChannelAdvisor Attribute
On Magento Admin Panel, navigate to WiseRobot → ChannelAdvisor API → Inventory → Attribute Map and do the following
- Magento Attribute: always select “Category Ids” to show which attribute on ChannelAdvisor referencing to the Ids of Magento Categories that a product belongs to.
- Channel Advisor Attribute: select any attributes which contain category Ids.
- Set Use Data from Parent Product to “No”
- Set Use in to “Import Only”
- Don't choose Use Value
- When complete, click on Save Mapping Table button
Then, they will have the category set correctly from that attribute item in ChannelAdvisor when products are imported.
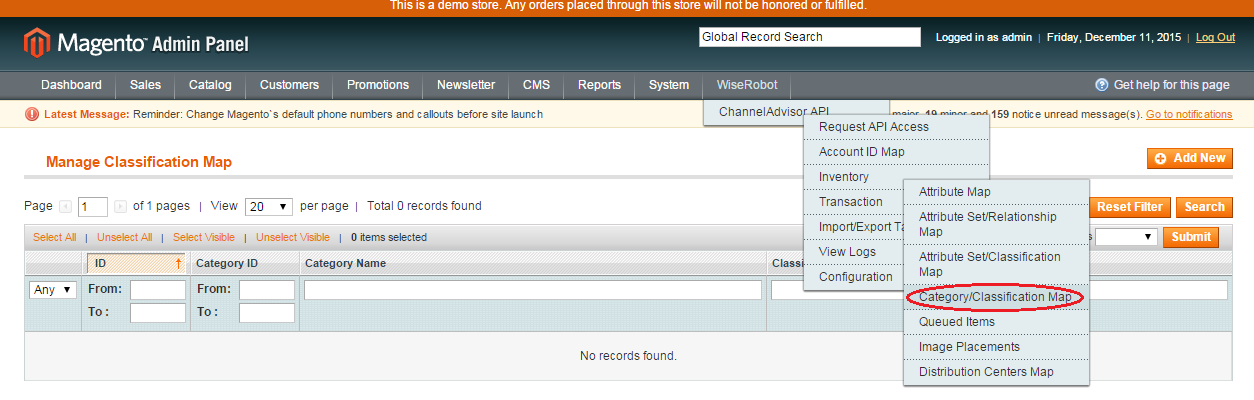
b. Method 2 - Use Category/Classification Map
- On Magento Admin Menu, navigate to WiseRobot → ChannelAdvisor API → Inventory → Category/Classification Map
-
Click on Add New button and complete two required fields
- Category: select one of Magento categories
- Classification: select one of the available classifications
- When complete, click Save button at the top-right corner to add them to the mapping table.
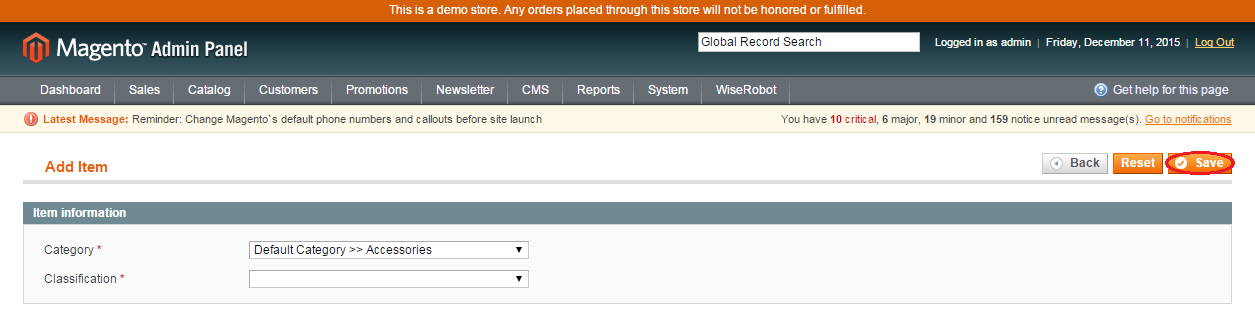
Note:
As can be seen in the screen shot, once the mapping is saved, the item will have the classification Bath Sheets and then will be imported into Magento with category Towels & Bedding under the Default Category.
c. Method 3 - Use the attribute mapping method
On Magento Admin Panel, navigate to WiseRobot → ChannelAdvisor API → Inventory → Attribute Map and do the following
- Magento Attribute: always select
Category Name
to show which attribute on ChannelAdvisor referencing to the name of Magento Categories that a product belongs to. - ChannelAdvisor Attribute: select any attributes which contain category name.
- Set Use Data from Parent Product to
No
- Set Use in to
Import Only
- Do not choose Use Value
- When complete, click Save Mapping Table
P-8. Image Placement Settings
Due to differing management structures, image management in Magento is somewhat different from the one in ChannelAdvisor. Thus, we need to create an “Image Placement” for images in Magento to make it easier to be mapped to the corresponding one in ChannelAdvisor when updated. In other words, when you change images in Magento, it will be sent to ChannelAdvisor directly at the correct image placement.
* To manage image placements for product update
On Magento Admin Menu, navigate to WiseRobot → ChannelAdvisor API → Inventory → Image Placements
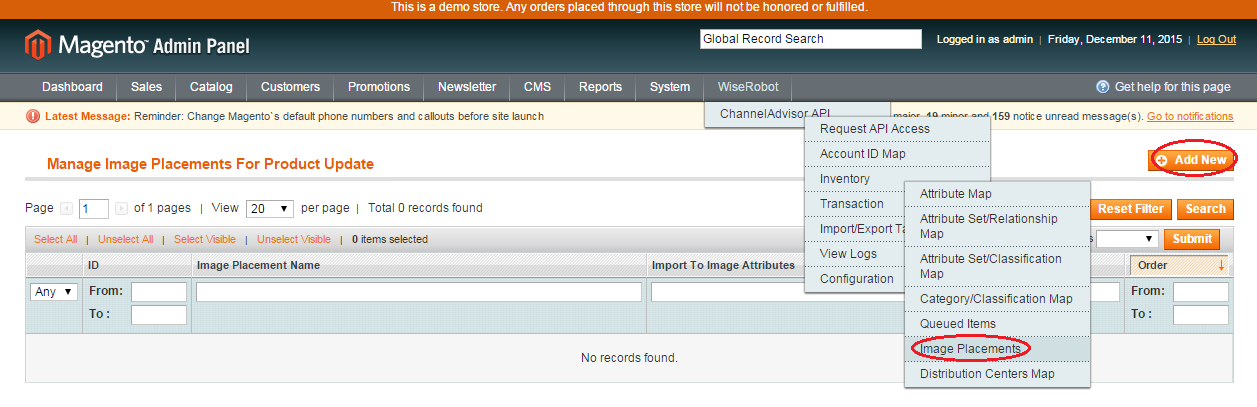
At the top-right corner, click on Add New button and complete the required fields
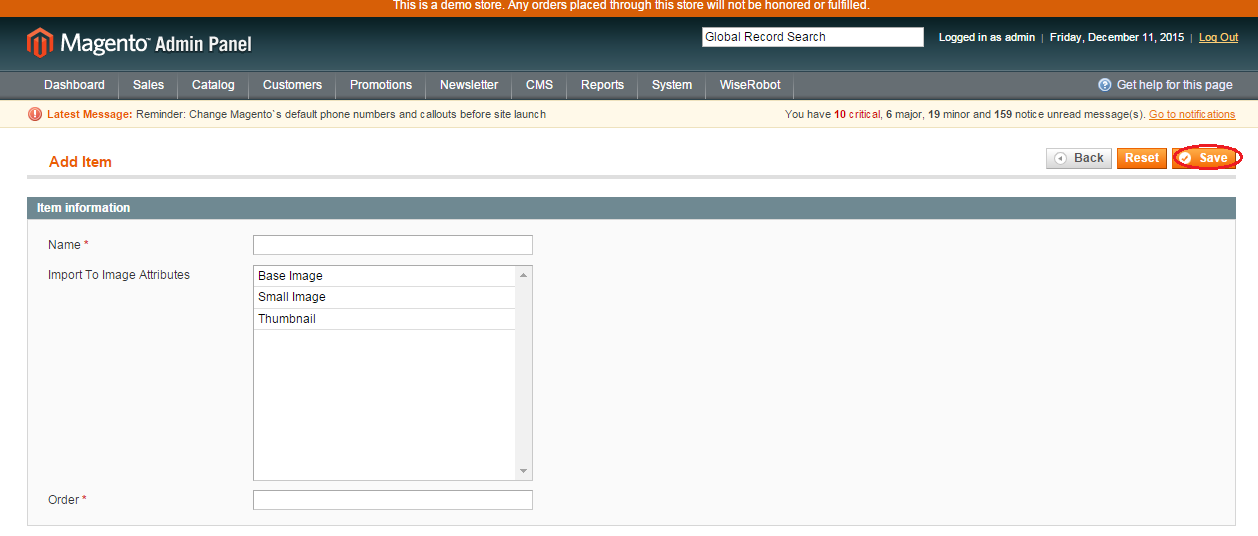
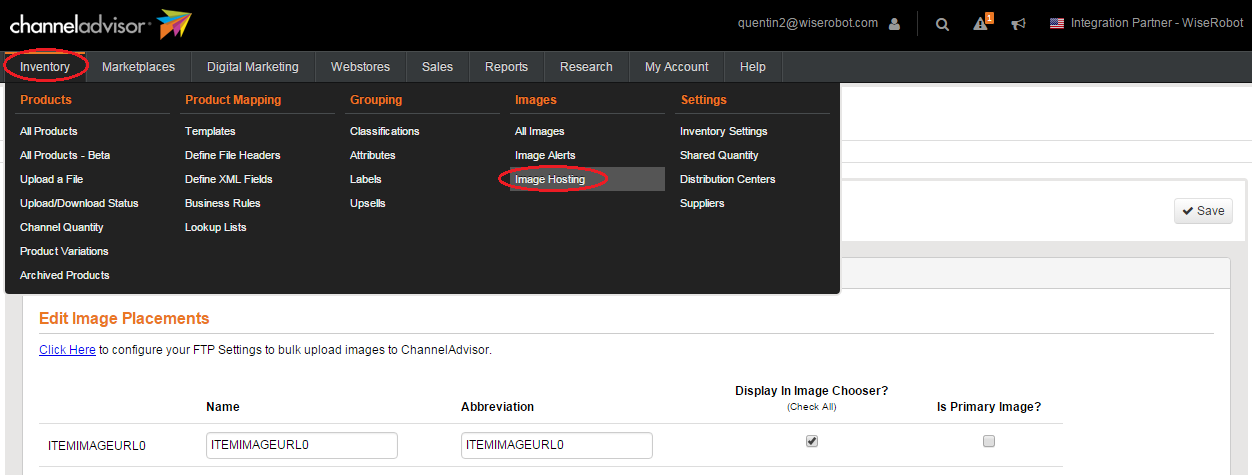
- Name: do the following to enter exactly the name of ChannelAdvisor Image Placements (On ChannelAdvisor Admin Panel, select Inventory → images → Image Hosting. A list of ChannelAdvisor Image Placements is available for you to choose). Look at the image below:
- Import to Image Attributes: select the types of image size.
- Order: enter sequentially. For example, the image name is “ITEMINAGEURL 7”. In Order field, enter “7”
- When complete, click Save button.
P-9. Shipping Methods and Payment Methods Mapping Settings
1. Shipping Methods Map
One of the fundamental features of the ChannelAdvisor to Magento Connector is Order Management and Fulfillment. To manage and fulfill orders from ChannelAdvisor, information about fulfillment (such as shipping carrier, shipping class, etc.) needs map to Magento. Our Shipping Methods Mapping tool accelerates the mapping process easier. To change, create or add new shipping methods map:
On the Magento Admin Panel, select WiseRobot → ChannelAdvisor API → Transaction → Shipping Methods Map
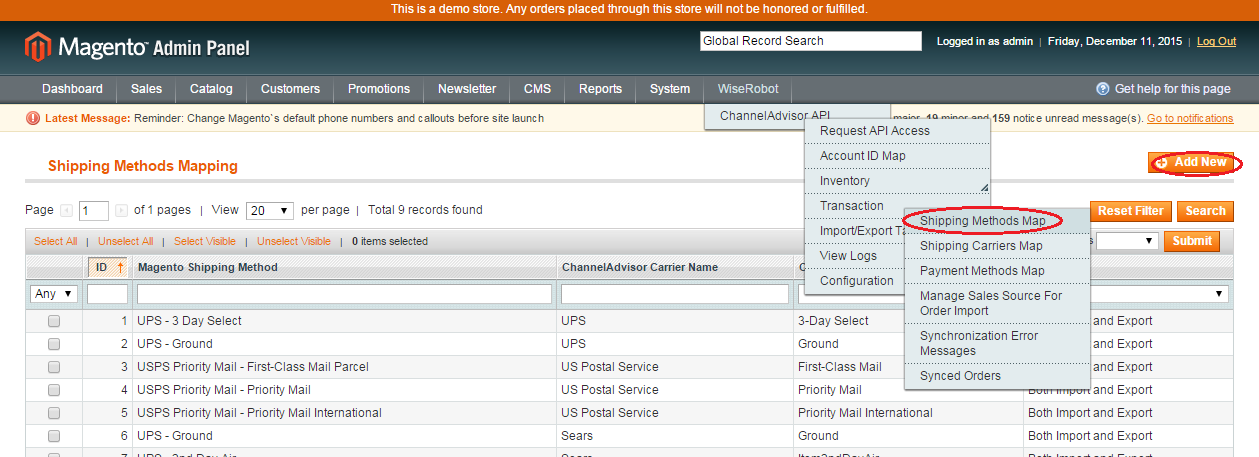
At the top-right corner, click on Add New button and complete the following
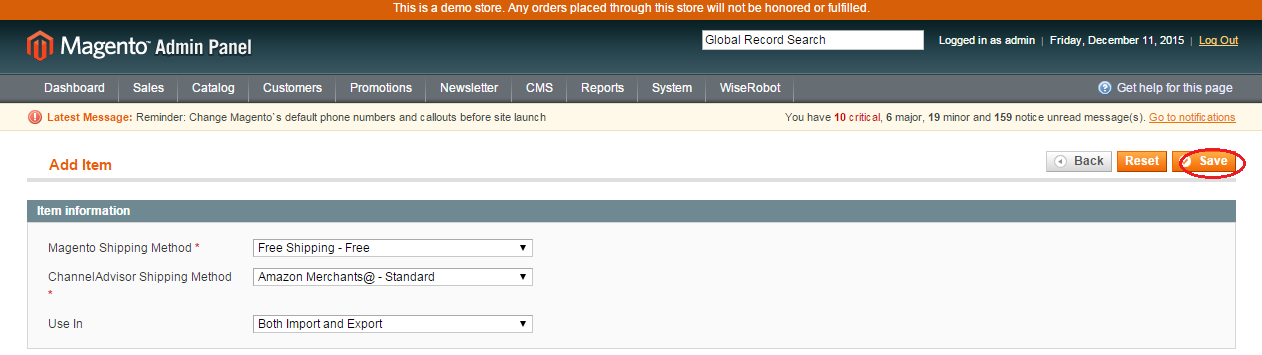
- Select Magento Shipping Method such as Free Shipping - Fee and Federal Express-Ground, etc.
- Select ChannelAdvisor Shipping Method such as Amazon Merchant@ Standard and eBay – Standard, etc.
- In Use In field, select one of the types such as Import Only, Export Only or Both
- When complete, click Save button at the top-right corner
2. Payment Methods Map
This is similar to Shipping Methods Map.
* To change, create or add new payment methods map
On the Magento Admin Menu, select WiseRobot → ChannelAdvisor API → Transaction → Payment Methods Map

At the top-right corner, click on Add New button and complete the required fields
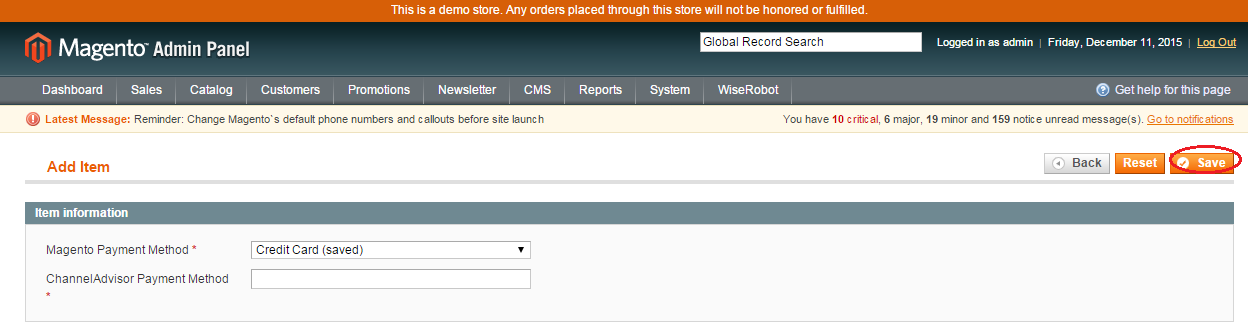
- Select Magento Payment Method such as Credit Card (saved), and Cash on Delivery, etc
- Enter ChannelAdvisor Payment Method
- When complete, click the Save button at the top-right corner.
P-10. Manage Sales Sources for Product Update Settings
Orders at many marketplaces will flow into Magento from ChannelAdvisor at a user designated interval (default 10 minutes). When orders are sent to Magento they can be managed and fulfilled.
With our connector, you can decide which sales sources are connected to ChannelAdvisor to import orders from. Furthermore, sending emails obtaining inclusive of order information to clients is also under your control.
* To manage Sales Sources for Products Update
On the Magento Admin Panel, select WiseRobot → ChannelAdvisor API → Transaction → Manage Sales Source for Order Import
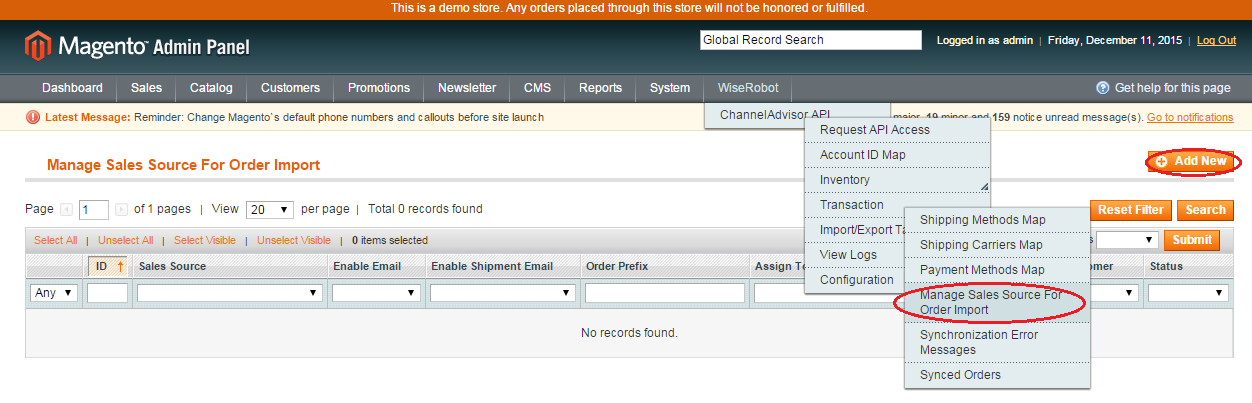
At the top-right corner, click on Add New button and complete the following
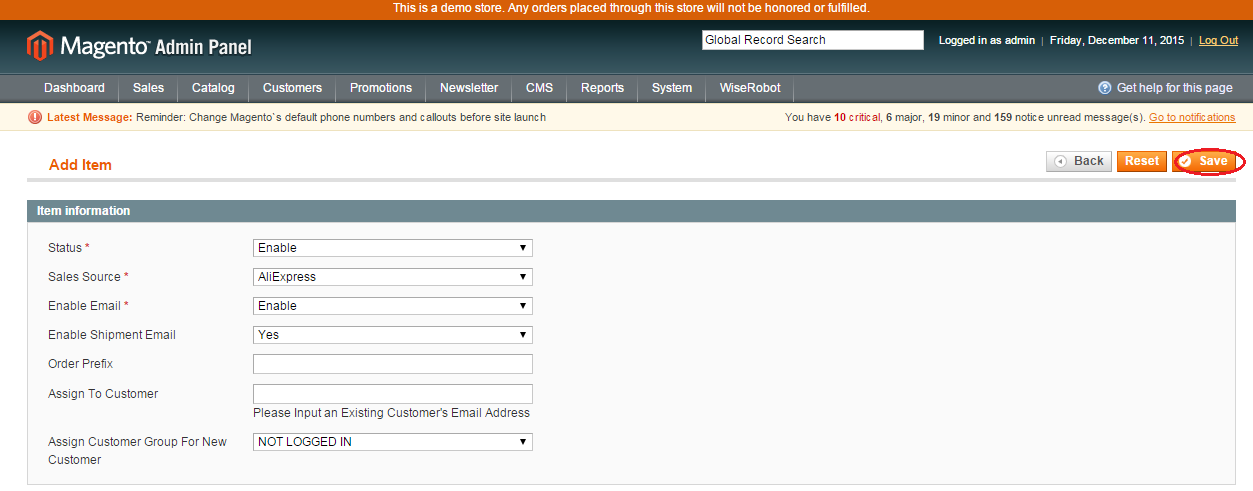
-
Set Status to
Enable
to activate this tool. - In the Sales Source field, select one of the sources you want to import orders.
-
Set Enable Email to
Enable
if you want to receive the notification from the system that you've finished adding prefix to your order ID at chosen marketplace. -
Set Enable Shipment Email to
Yes
- Enter Order Prefix section, the prefixes which are convenient for your management such as AMUK standing for AMAZON_UK, etc. In the Order prefix section, you create the prefix for each Sales Source, our module can base on it (Order prefix) to identify orders and send fulfillment information such as shipping carrier, shipping fee, type and other shipping details to clients via ChannelAdvisor. When finishing your set up at new item information in Manage Sales Source of Products Update, please do not forget to click on
Save
button. - Assign to Customer you need to fill a customer’s address into the field to assign the marketplace for the customer. When import an order from marketplace, the original customer of that order will be replaced by the customer who is set here.
- Assign Customer Group for New Customer to select a customer group for new customer creation when import order from that marketplace. You can select from list of existing customer groups in this field. A new customer will be created with the customer group you select here when orders from the marketplace are imported. You need to click on Save button to save the change you made after finishing.
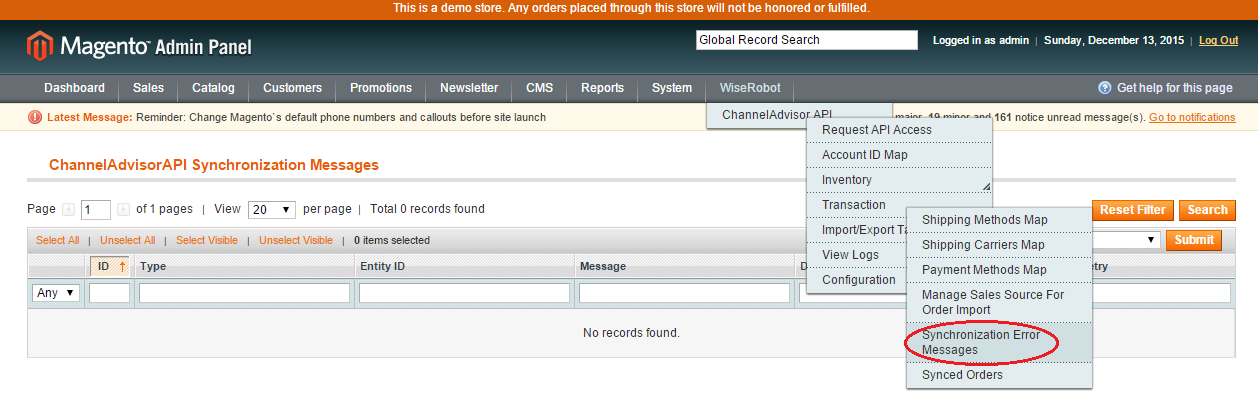
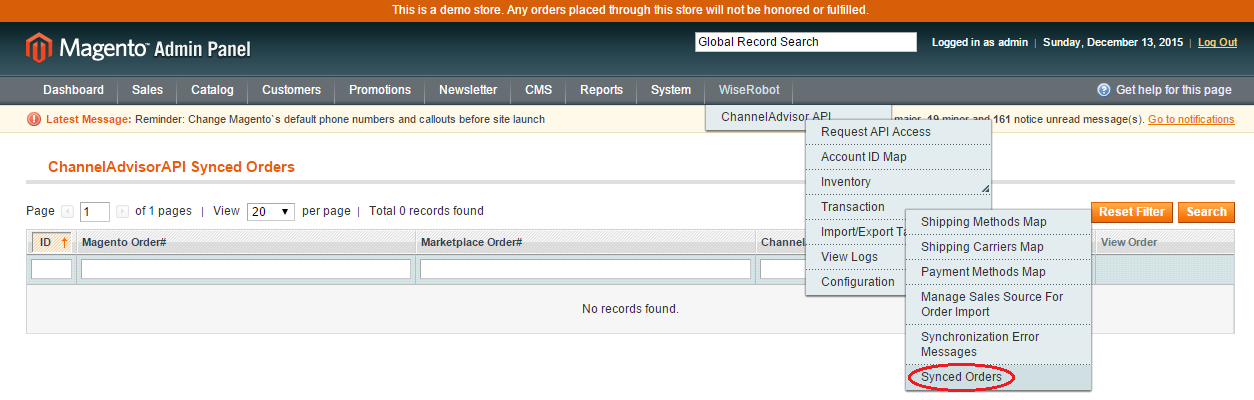
P-11. Synchronization Error Messages/Synced Orders
If orders/shipments send to ChannelAdvisor unsuccessfully, they will be showed in Synchronization Messages page. On the other hand, orders/shipments will be showed in Synced Orders page when they send to ChannelAdvisor successfully.
On the Magento Admin Panel, select WiseRobot → ChannelAdvisor API → Transaction → Synchronization Error Messages
On the Magento Admin Panel, select WiseRobot → ChannelAdvisor API → Transaction → Synced Orders
P-12. Mass Update to ChannelAdvisor Settings
This is one of the most indispensable tools that our module aids you in updating a huge amount of information into ChannelAdvisor from modifications or changes in Magento. This script is often used right at the start of integrating your Magento store with ChanneAdvisor when you need to update all product inventory in one go, or when you need to update some SKU's due to recent mass updates via CSV files.
* To start Mass Update to ChannelAdvisor
On the Magento Admin Panel, navigate to WiseRobot → ChannelAdvisor API → Import/Export Tasks → Mass Update to ChannelAdvisor
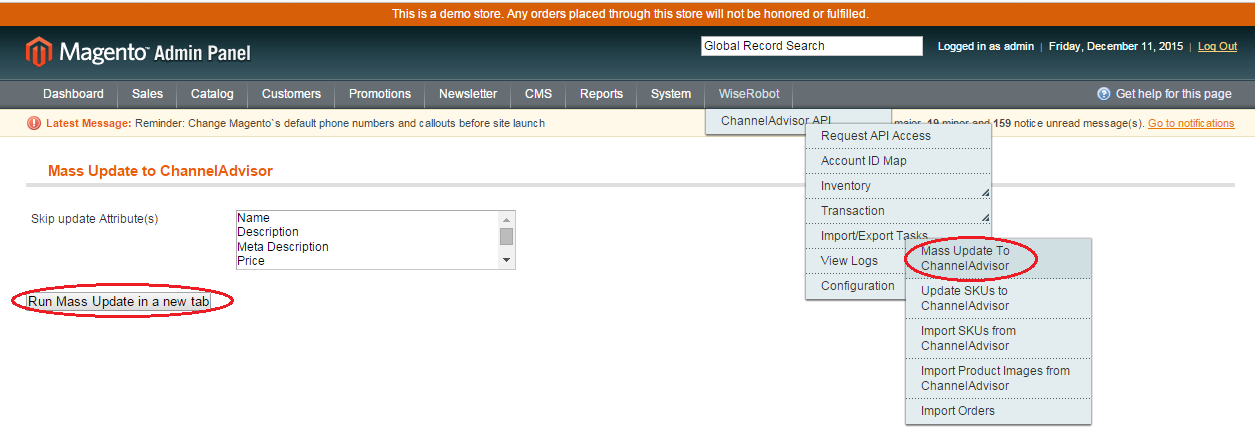
-
In the box
Skip update Attribute(s)
, choose attribute(s) that you don’t want to update. - Click on Run Mass Update to in a new tab button to commence your Mass update. After clicking this button, the other tap will appear to let you know whether the Mass Update to ChannelAdvisor is successful or not.
P-13. Update SKUs to ChannelAdvisor/Import SKUs or Product Images from ChannelAdvisor
1. Manually Update SKUS to ChannelAdvisor
On the Magento Admin Panel, navigate to WiseRobot → ChannelAdvisor API → Import/Export Tasks → Update SKUS to ChannelAdvisor
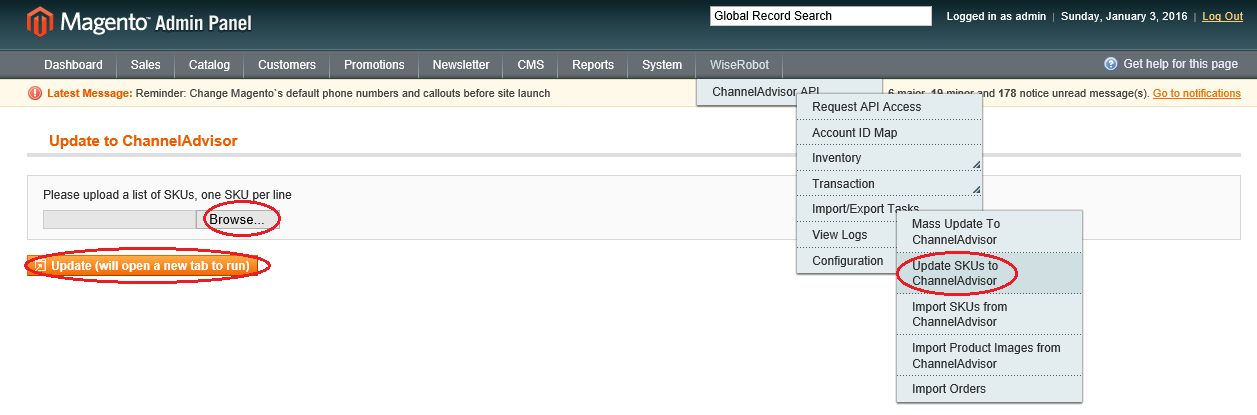
Select Browse button to upload a list of SKUS. Then, click on Update (will open a new tab to run) button to start. After that, the new tap will appear to let you know whether the process of Update SKUS to ChannelAdvisor is successful or not.
2. Import SKUS from ChannelAdvisor
On the Magento Admin Panel, navigate to WiseRobot → ChannelAdvisor API → Import/Export Tasks → Import SKUS from ChannelAdvisor
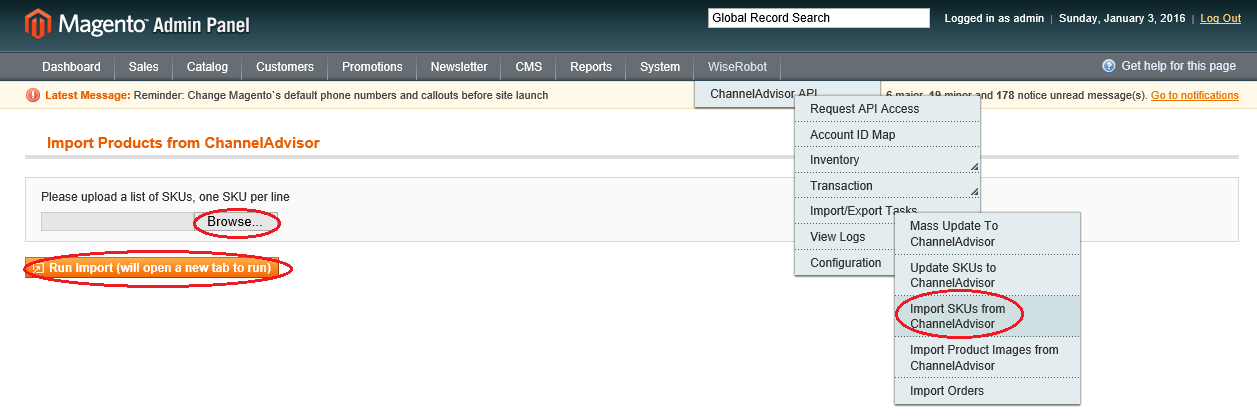
Select Browse button to upload a list of SKUS. Then, click on Run Import (will open a new tab to run) button to start. After that, the new tap will appear to let you know whether the process of Import SKUS from ChannelAdvisor is successful or not.
3. Import Product images from ChannelAdvisor
On the Magento Admin Menu, navigate to WiseRobot → ChannelAdvisor API → Import/Export Tasks → Import Product Images from ChannelAdvisor
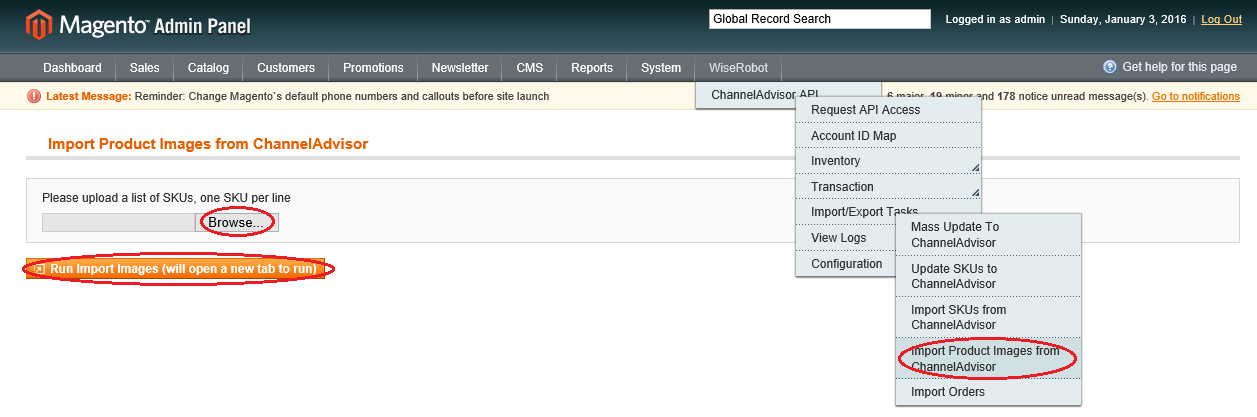
Select Browse button to upload a list of SKUS. Then, click on Run Import images (will open a new tab to run) button to start. After that, the new tap will appear to let you know whether the process of Import Product images from ChannelAdvisor is successful or not.
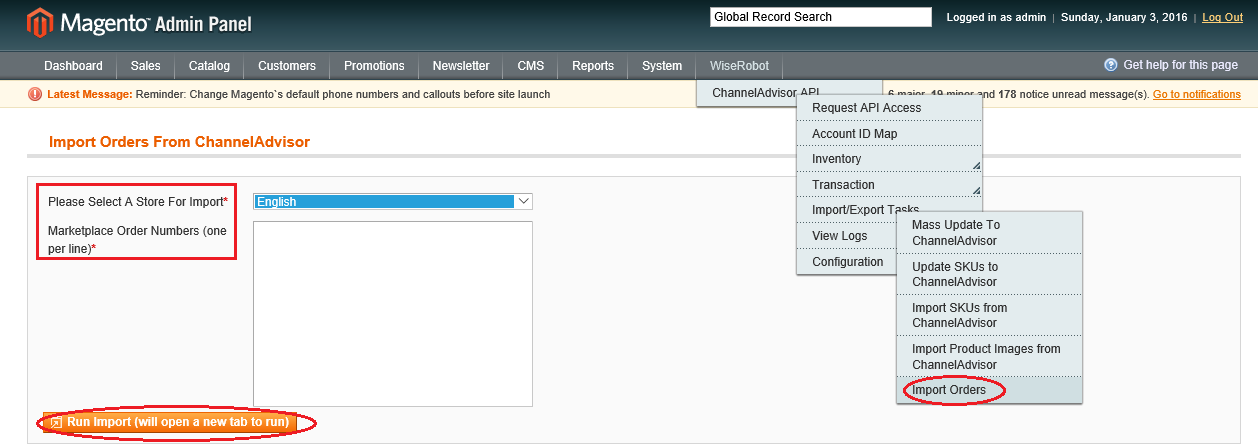
4. Import orders
On the Magento Admin Menu, navigate to WiseRobot → ChannelAdvisor API → Import/Export Tasks → Import Orders
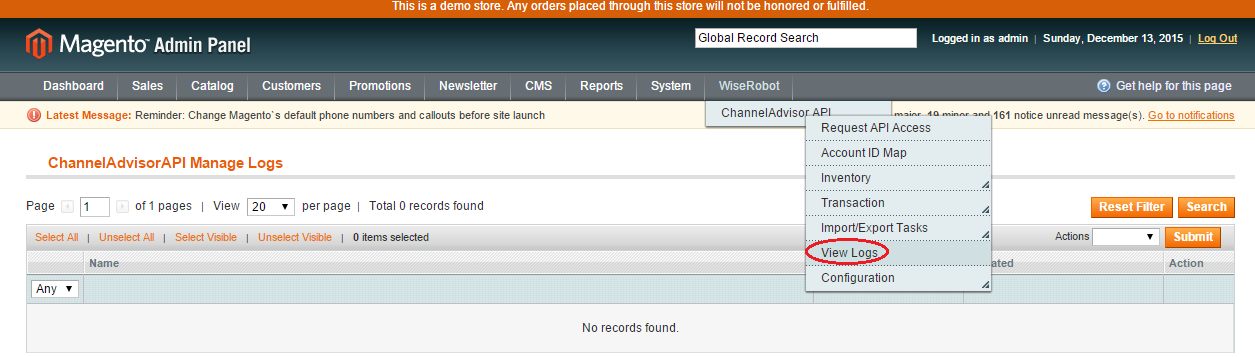
P-14. View Logs
On the Magento Admin Panel, select WiseRobot → ChannelAdvisor API → View Logs
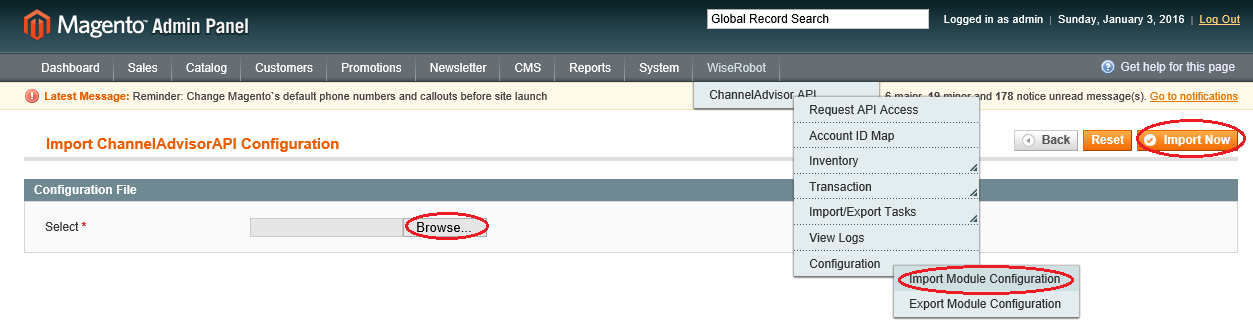
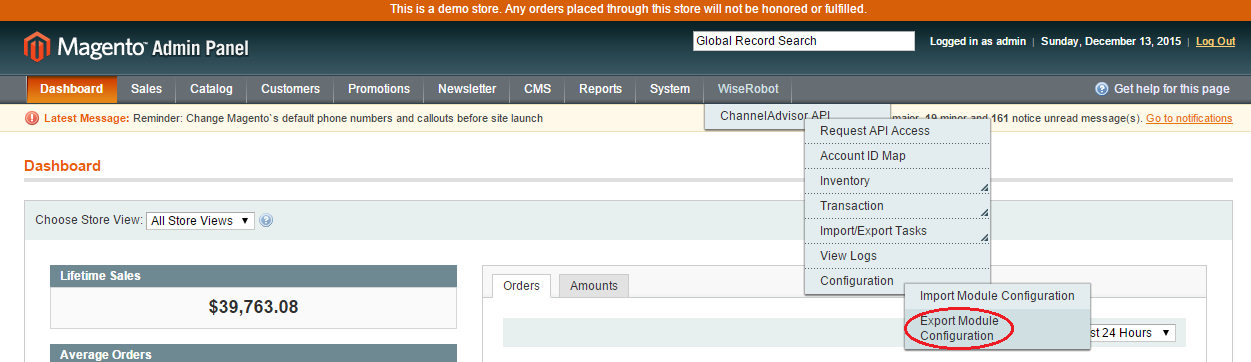
P-15. Import/Export Module Configuration
The meaning of these functions is the similar to the tittle. You can export the module configuration to your computer for reserve. By contrast, you can import the module configuration from your computer to upload your last work.
- On the Magento Admin Panel, select WiseRobot → ChannelAdvisor API → Configuration → Import/Export Module Configuration
- On the Magento Admin Panel, select WiseRobot → ChannelAdvisor API → Configuration → Export Module Configuration